


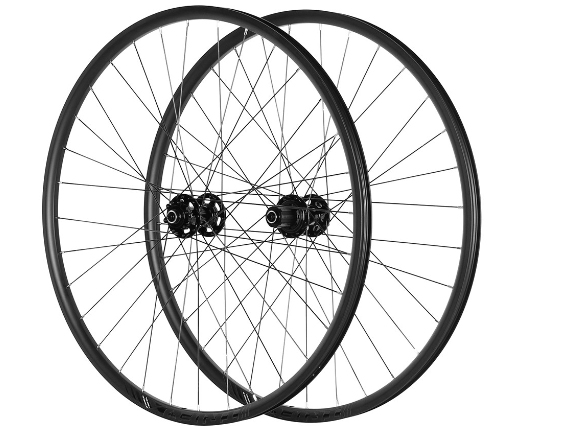
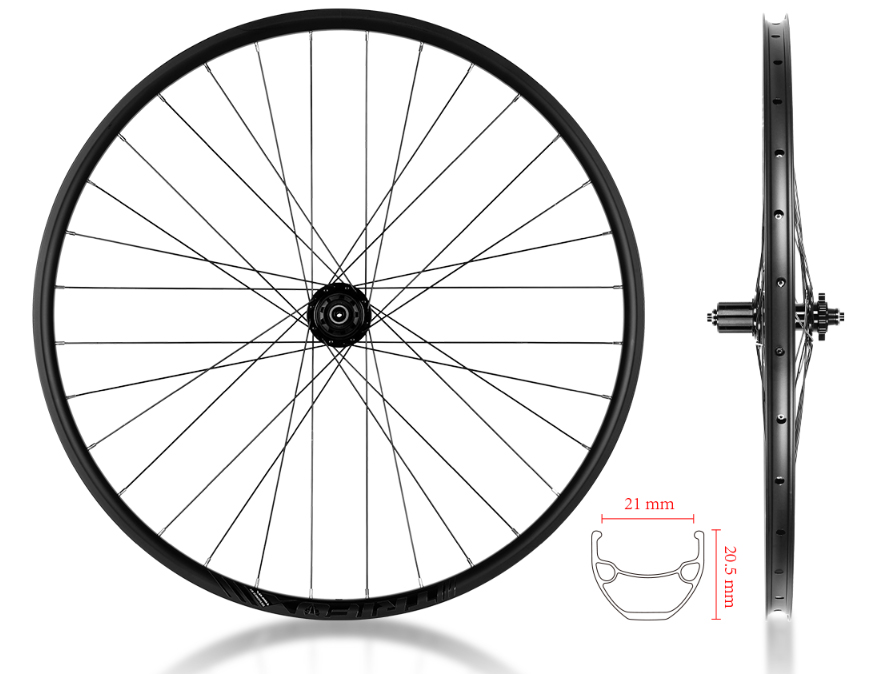
Upgrading your ride with aluminum racing bike wheels is a surefire way to enhance your performance, whether you're tearing up the mountain trails or cruising on the road. The choice of wheels can significantly affect your bike's handling, speed, and overall ride quality. Aluminum has long been favored for its balance of strength, weight, and cost, making it an attractive option for many cyclists seeking performance improvements without breaking the bank. The Importance of Wheel Upgrades Wheels are among the most crucial components when it comes to bike upgrades. They influence your ride's efficiency, acceleration, and ability to tackle various terrains. Lightweight and durable wheels can reduce the effort needed to pedal, allowing you to go faster and further with less fatigue. This is where aluminum racing bike wheels shine, offering a perfect compromise between the responsiveness of carbon fiber and the affordability of heavier metals. Why Choose Aluminum Racing Bike Wheels? Aluminum wheels, including those available from TrifoxBike, provide several advantages. They are known for their durability and performance, especially suitable for mountain biking enthusiasts. For instance, the Alloy Mountain Bike Wheels WM823 BOOST and the Alloy Mountain Bike Wheelset WM823 from TrifoxBike are designed to withstand the rigors of off-road riding while maintaining a lightweight construction. This ensures optimal speed and agility on the trails. Benefits of Upgrading to TrifoxBike Aluminum Wheels High-Quality Goods: TrifoxBike prides itself on offering top-quality aluminum wheels that enhance your riding experience. Whether you're an amateur or a seasoned pro, upgrading to a set of high-performance wheels can make a noticeable difference in your ride. Secure Payment: Security is paramount, especially when shopping online. TrifoxBike provides multiple safe payment methods, ensuring your transactions are secure. Choosing the Right Aluminum Wheels for Your Ride When selecting aluminum racing bike wheels, consider the following factors: Terrain: Are you primarily riding on roads or trails? The WM823 BOOST is ideal for rugged off-road conditions, while other models might suit mixed or road-only riding better. Riding Goals: Are you looking to improve speed, enjoy more comfortable long-distance rides, or perhaps both? Different wheelsets cater to various performance aspects. Compatibility: Ensure the wheels you choose are compatible with your bike in terms of size and the type of brakes you use. Budget: Determine how much you're willing to invest in an upgrade. Remember, a good set of wheels is an investment in your riding enjoyment and performance. How to Upgrade Upgrading to new wheels is relatively straightforward but requires some technical knowledge. If you're comfortable doing it yourself, you'll need to: Remove your current wheels, carefully detaching the brake system and, if present, the gears. Install the new wheels, ensuring they are securely fastened and that the brake systems are correctly reattached. Adjust the brakes and gears as necessary to accommodate the new wheels. If you're not confident in performing these steps, it's best to have your new wheels installed by a professional at a local bike shop. This ensures everything is set up correctly and safely. Conclusion Aluminum racing bike wheels offer a fantastic balance of performance, durability, and cost. Upgrading to a set from a reputable supplier like TrifoxBike can transform your cycling experience, providing faster speeds, better handling, and more enjoyable rides. With options like the WM823 BOOST and Alloy Mountain Bike Wheelset WM823, along with benefits like quality assurance, support, and secure payment options, TrifoxBike makes it easy to elevate your ride. Whether you're a competitive racer or a weekend warrior, investing in a quality set of aluminum wheels is a decision you won't regret. For more information on upgrading your ride with aluminum racing bike wheels, check out TrifoxBike's offerings and take the first step towards a superior cycling experience.
Selecting the ideal bicycle tire width is not merely a matter of aesthetics; it's a crucial decision that affects comfort, speed, grip, and overall ride quality. With the range of options available today, cyclists can tailor their bikes to suit specific terrains, riding styles, and personal preferences. Understanding Tire Width Bicycle tires come in a wide variety of widths, typically ranging from narrow road tires at about 23mm to wide mountain biking tires up to 2.5 inches or more. Each width serves different riding conditions and offers a distinct set of advantages and trade-offs. Consider Your Riding Discipline Road Biking: Traditional wisdom favored narrower tires for road biking, under the assumption that they reduced rolling resistance. However, recent studies and professional practice have shifted towards slightly wider tires, such as 25mm or 28mm, for road use. These offer a better grip and more comfort without significantly increasing resistance, making them a superior choice for most road riders. Mountain Biking: Tire width is critical for mountain biking due to the varied and often challenging terrain. Wider tires, around 2.1 to 2.6 inches, provide increased traction and stability, essential for navigating rocky trails and loose surfaces. The exact width within this range depends on the specific conditions you ride in – with rougher, more technical trails calling for wider tires. Gravel and Touring: For gravel and touring bikes, where riders encounter a mix of terrains, tire widths from 35mm to 45mm are common. These widths offer a compromise between speed and comfort on uneven surfaces, providing enough cushioning for long rides while still maintaining reasonable efficiency on paved roads. Assess Your Weight and Riding Style Heavier riders or those who carry additional gear on their bikes might benefit from slightly wider tires, which can better support the extra weight. Similarly, if you prioritize comfort over speed—perhaps for leisurely rides or long distances—wider tires can offer more cushioning against road vibrations. Conversely, if speed and agility are your main goals, sticking to the narrower end of the spectrum suitable for your discipline might be best. Terrain and Conditions The surfaces you ride on most frequently should heavily influence your tire width choice. Smooth, well-maintained roads allow for narrower tires, while rough or unpaved paths demand wider tires for better grip and puncture resistance. Additionally, consider weather conditions; wider tires can provide more stability and confidence in wet or slippery conditions. Bike Compatibility Before settling on a tire width, ensure your bike frame and fork have enough clearance to accommodate it. This is particularly important if you plan to increase tire width significantly. Check the manufacturer's specifications for maximum tire clearance and remember that adding mudguards or fenders will require additional space. Rolling Resistance vs. Comfort While it's been suggested that narrower tires offer lower rolling resistance, recent research shows that at the same pressure, wider tires can actually have less rolling resistance due to their shorter contact patch. However, wider tires are often run at lower pressures for increased comfort, which can increase rolling resistance. It's about finding the right balance for your needs. A higher volume tire (wider) allows you to run lower pressures, which can absorb road irregularities better, leading to a smoother, more comfortable ride. If you're racing or always riding on smooth tarmac, minimal rolling resistance might be your priority. For endurance rides, adventure cycling, or commutes, comfort could take precedence. Experiment and Personal Preference Ultimately, the ideal tire width is a deeply personal choice that can vary widely among cyclists. What feels right for one person might not suit another, depending on individual preferences for comfort, speed, handling, and the type of cycling they enjoy most. If possible, experiment with different tire widths to find what works best for you. Many riders find that a slight increase in width from what they're used to leads to a significantly more enjoyable riding experience. Conclusion Determining the ideal bicycle tire width requires a thoughtful consideration of your riding style, the terrains you frequent, your weight, and the specific conditions under which you ride. By understanding the implications of tire width on performance and comfort, you can make an informed decision that enhances your cycling experience. Whether you're gliding over smooth asphalt, tackling rugged mountain trails, or exploring gravel paths, the right tire width can make all the difference. Remember, cycling is about enjoyment and exploration, so choose a tire that will maximize those feelings on every ride.
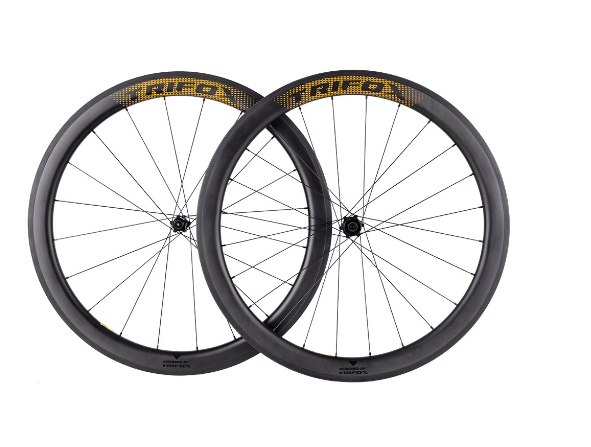
Selecting the best aero rim brake wheelset can drastically transform your cycling experience, providing unparalleled speed and efficiency. Whether you're training for a race, participating in group rides, or simply aiming to improve your personal bests, the right aero wheelset is a crucial component. Understanding Aero Rim Brake Wheelsets Aero rim brake wheelsets are designed with aerodynamics at the forefront, featuring rims with a profile shape that reduces air resistance. This design allows cyclists to maintain higher speeds with less effort, especially in straight-line riding conditions. While the benefits of aero wheels are most pronounced at speeds over 20mph, even moderate-speed riders can enjoy the advantages of reduced drag and improved performance. Material Matters: Carbon vs. Aluminum The material of the wheelset plays a significant role in its performance, weight, and durability. Carbon fiber is the preferred choice for aero wheelsets due to its strength-to-weight ratio and ability to be molded into aerodynamic shapes. Carbon wheels are typically lighter and stiffer, providing a noticeable performance upgrade, especially on climbs and during acceleration. However, they often come at a higher price point. Aluminum wheelsets, while generally heavier and less aerodynamic than carbon, offer a more cost-effective solution with great durability. For those on a budget or riders who prioritize longevity over the ultimate in speed, aluminum aero wheels can still provide a noticeable efficiency boost. Rim Depth: Finding the Sweet Spot Rim depth is a key factor in the aerodynamics of a wheelset. Deeper rims reduce drag by smoothing airflow over the wheel, but they can also increase weight and susceptibility to crosswinds. A mid-depth rim of around 40-50mm strikes a good balance for most riders, offering significant aerodynamic benefits without undue handling challenges. However, the optimal rim depth also depends on your typical riding conditions and personal preferences. Riders frequently encountering strong winds may opt for shallower rims for better control, while those focused on flat time trials or triathlons might benefit from even deeper rims. Spoke Count and Pattern The number and pattern of spokes on a wheel affect both aerodynamics and stiffness. Fewer spokes reduce drag but can compromise wheel stiffness and durability. Most aero wheelsets find a balance with spoke counts lower than traditional wheels, paired with patterns designed to maintain structural integrity. Bladed spokes, which have a flattened profile, further reduce air resistance and are a common feature on high-quality aero wheelsets. Assess your weight and riding style to ensure the chosen spoke design can adequately support you without sacrificing performance. Compatibility and Brake Type When selecting an aero rim brake wheelset, ensure it is compatible with your bike’s braking system. Although disc brakes are gaining popularity, many riders still prefer the simplicity and weight advantages of rim brakes. Check that the wheelset’s brake track is suitable for your brake type (carbon-specific brake pads for carbon rims, for example) and that the hub is compatible with your drivetrain. Hub Quality and Bearings Hubs, the central part of the wheel where the spokes meet, play a crucial role in rolling efficiency. High-quality hubs with smooth, durable bearings can significantly reduce rolling resistance, contributing to a faster and more efficient ride. Look for reputable manufacturers and consider options like ceramic bearings for the ultimate in low-friction performance. Conclusion Choosing the right aero rim brake wheelset involves balancing factors such as material, rim depth, spoke configuration, compatibility, and hubs. By carefully considering these elements, you can select a wheelset that not only enhances your bike's aesthetics but significantly improves your speed and efficiency on the road. Remember, the best aero wheelset is one that aligns with your riding style, goals, and conditions, propelling you to new heights of cycling performance.
Installing and maintaining centerlock disc brakes on your bicycle is a pivotal skill that can enhance your riding experience by providing consistent stopping power and improved control under various conditions. Unlike traditional rim brakes, centerlock disc brakes offer superior performance, especially in wet and muddy conditions, making them a popular choice among both road cyclists and mountain bikers. Understanding Centerlock Disc Brakes Centerlock disc brakes use a special mounting system developed by Shimano to attach the brake rotor to the hub. The system allows for quicker rotor swaps and a more reliable connection by using a splined interface and a lockring to secure the rotor in place. This design simplifies installation and maintenance while offering an aesthetically pleasing look. Tools and Materials Needed Before beginning the installation process, make sure you have the following tools and materials: Centerlock-compatible rotor Torque wrench Lockring tool (specific to centerlock systems) Isopropyl alcohol Clean rag Installation Process Prepare the Hub: Start by removing the wheel from your bike. If your hub already has a rotor installed, remove the old rotor by loosening the lockring with the lockring tool. Clean the hub surface to ensure it's free of dirt and grease. Install the Rotor: Take your new centerlock rotor and align its splines with those on the hub. Gently slide the rotor into place, ensuring it sits flush against the hub. Secure the Rotor: Place the lockring onto the hub and tighten it by hand to ensure the rotor is properly seated. Then, using the lockring tool and a torque wrench, tighten the lockring to the manufacturer's recommended torque specification. This step is crucial to prevent the rotor from coming loose during rides. Reinstall the Wheel: Once the rotor is securely fastened, reinstall the wheel on your bike. Make sure the wheel is correctly seated in the dropouts and the quick-release or thru-axle is tightly secured. Check the Brake Caliper Alignment: Before riding, check that the brake caliper is correctly aligned so that the pads are evenly spaced around the rotor. If necessary, adjust the caliper position to avoid rubbing. Maintenance Tips Regular maintenance of your centerlock disc brakes will ensure they continue to perform optimally. Here are some tips to keep your brakes in top condition: Clean the Rotors Regularly: Use isopropyl alcohol and a clean rag to wipe down your rotors periodically, especially after riding in wet or muddy conditions. This prevents buildup of debris and ensures consistent braking performance. Inspect Brake Pads for Wear: Disc brake pads wear down over time and need to be replaced when they become too thin. Check pad thickness regularly and replace the pads if they are worn down to the manufacturer's recommended limit. Bleed Hydraulic Brakes: If your disc brakes are hydraulic, they may require bleeding to remove air bubbles from the brake lines. This process varies by brake model, so consult your brake's documentation for specific instructions. Listen for Noises: Squealing or grinding noises during braking can indicate dirty or misaligned rotors, contaminated brake pads, or other issues. Address any unusual sounds promptly to maintain brake performance and safety. Tighten the Lockring Periodically: Check the tightness of the rotor lockring periodically, especially if you frequently swap rotors. Use a torque wrench to ensure it's tightened to the correct specification. By following these installation and maintenance steps, you can enjoy the benefits of centerlock disc brakes and ensure your bicycle is safe and responsive, no matter where your rides take you. Whether you're a seasoned pro or new to the world of cycling, mastering the art of working with centerlock disc brakes is a valuable skill that will enhance your overall cycling experience.

Choosing the perfect size M bike for your riding style is an essential step towards a comfortable, efficient, and enjoyable cycling experience. Whether you're a seasoned rider or new to the biking world, understanding how to select the right bike size can greatly enhance your performance and overall enjoyment of the ride. Understand Your Riding Style The first step in choosing the perfect bike size is to clearly define your riding style. Are you into road biking, mountain biking, or hybrid cycling? Each style demands specific bike features and sizes for optimal performance. Road bikes, for instance, often require a snugger fit for aerodynamics and speed, while mountain bikes offer a bit more room for maneuverability on rough terrains. Know the Size Chart Bike sizes are typically categorized by frame size, which is measured in centimeters for road bikes and inches for mountain bikes. An M-size bike generally corresponds to a medium size, which is usually around 54-56 cm (21-22 inches) for road bikes and 17-18 inches for mountain bikes. However, these measurements can vary slightly between manufacturers, so it’s crucial to check the specific size chart provided by the bike brand. Measure Your Height and Inseam Your height and inseam length are pivotal measurements when determining the right bike size. To measure your height, stand against a wall without shoes and mark the top of your head to get an accurate measurement. For your inseam, stand with your back against the wall and a book between your legs—mimicking a bike seat—and measure from the top of the book to the floor. These measurements will help you find a bike frame that allows for proper leg extension and comfortable reach to the handlebars. Evaluate Bike Geometry Bike geometry plays a significant role in finding the right fit. It refers to the angles and lengths of different bike frame parts, including the top tube, seat tube, and head tube. A bike with a longer top tube may suit riders looking for a stretched-out position, typical of racing or long-distance road biking. On the other hand, bikes designed for agility and comfort, like many mountain and hybrid bikes, often have a shorter top tube to facilitate an upright riding posture. Consider Adjustments and Components Even within the same size, bikes can offer different levels of adjustability. Seat height, handlebar height, and reach can often be adjusted to fine-tune the fit. Additionally, the choice of components such as the saddle, pedals, and handlebars can affect your overall comfort and performance. For example, wider handlebars may offer more control for mountain biking, while narrower bars could be preferable for road cycling. Test Ride Different Bikes Nothing beats the insights gained from a test ride. Visit your local bike shop and try out several M-sized bikes within your preferred type. Pay attention to how each bike feels in terms of comfort, ease of pedaling, handling, and reach to the components. During the test ride, consider aspects like: Comfort: Are you able to ride without straining your neck, shoulders, or back? Control: Do you feel in command of the bike even when turning or going over bumps? Efficiency: Can you pedal smoothly and effectively without feeling cramped or overly stretched? Seek Professional Fitting If you're investing in a high-end bike or if you plan to spend significant time riding, consider getting a professional bike fitting. A bike fitting expert will take comprehensive measurements and adjust your bike to fit your body dimensions precisely. This service can greatly improve comfort, efficiency, and prevent injuries associated with poor bike fit. Final Thoughts Selecting the perfect size M bike is a blend of art and science, requiring consideration of various factors tailored to your body dimensions and riding preferences. By understanding your riding style, knowing the size charts, taking accurate measurements, evaluating bike geometry, considering component adjustments, test riding, and potentially seeking professional fitting, you'll be well on your way to enjoying countless miles of comfortable and rewarding cycling experiences. Remember, the right bike is not just about size; it's about the perfect synthesis of fit, form, and function to complement your unique riding style.
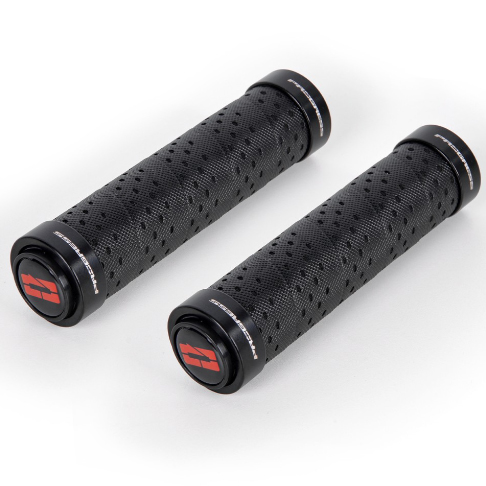
Achieving the perfect balance of comfort and control on your bike largely depends on one critical touchpoint: the handlebar grips. Whether you're navigating rugged trails, cruising city streets, or competing in a race, the right grips can significantly enhance your riding experience. Understand Grip Types: Handlebar grips come in various shapes, materials, and textures. Ergonomic grips are designed to conform to the shape of your hand, reducing pressure points and fatigue during long rides. Lock-on grips feature a clamp system that prevents them from twisting or slipping, offering reliable control in all conditions. Foam grips, meanwhile, are known for their light weight and exceptional vibration damping properties. Select the Right Material: Rubber grips are popular for their durability and range of textures, offering a secure grip in wet or dry conditions. Silicone grips are softer and absorb vibrations well but might wear out faster than rubber. For those seeking the ultimate in comfort and shock absorption, foam grips are an excellent choice, though they may not provide as much direct feedback as rubber or silicone. Consider Bar Ends: For riders looking for additional hand positions and leverage, especially on climbs, grips with integrated or add-on bar ends can offer a significant advantage. They allow you to change your grip position, reducing strain on your hands, wrists, and shoulders during long rides. Grip Texture and Thickness: The texture of your grips should match your usual riding conditions. Smoother grips may suffice for calm, road biking, while a more aggressive texture provides extra hold for off-road adventures. The thickness of the grips also plays into comfort, with thicker grips offering more cushioning but potentially feeling bulkier for riders with smaller hands. It's a personal preference, so consider testing a few options to find what works best for you. Installation Tips: When installing new grips, cleanliness is key. Ensure both the handlebar and inside of the grips are clean and dry. For slip-on grips, a bit of hairspray or alcohol inside the grip can help it slide on easier and then stick in place once dry. For lock-on grips, simply slide them onto the bar and tighten the clamp bolts evenly for a secure fit. Maintenance: Regularly check your grips for wear and tear, especially if you ride frequently or in harsh conditions. Worn-out grips can reduce your control over the bike and lead to discomfort or blisters. In Conclusion, upgrading to the best handlebar grips for your needs is a simple yet effective way to improve both comfort and control on your bike. By understanding the types of grips available, choosing the right material and features for your riding style, and ensuring a proper installation, you can enjoy a more comfortable, controlled, and enjoyable ride every time.
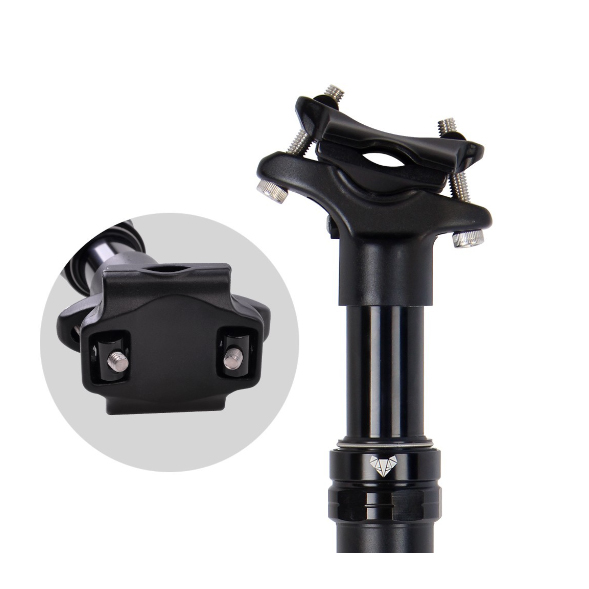
Upgrading your ride with the ideal bicycle seatpost can transform your biking experience, offering increased comfort, better bike fit, and enhanced performance. The seatpost is a crucial yet often overlooked component that connects your bike's frame to the saddle, playing a significant role in ride quality and efficiency. 1. Determine Your Needs: Start by assessing what you want from a seatpost upgrade. Are you seeking more comfort on long rides? Do you need a lighter post for racing? Or perhaps adjustability on the fly with a dropper post for mountain biking? Identifying your needs will guide your selection process. 2. Select the Right Diameter and Length: Seatposts come in various diameters and lengths. It's vital to choose one that matches your bike’s specifications. The diameter must fit your frame's seat tube precisely, so use calipers to measure the current seatpost or consult your bike's manual for specifications. Length is important if you find yourself needing more height than your current post can provide or if you're tall and need extra extension. 3. Material Matters: Seatposts are typically made from aluminum, carbon fiber, or titanium. Aluminum offers a good balance of strength, weight, and cost. Carbon fiber is lighter and can absorb road vibrations better, enhancing comfort but at a higher price. Titanium combines strength, lightness, and vibration damping but is the most expensive. Choose based on your balance of comfort, weight, and budget. 4. Consider the Setback: The setback of a seatpost refers to how far back the saddle sits relative to the post's insertion point into the frame. If you're looking to adjust your riding position for better leg extension or more aerodynamics, consider a seatpost with a different setback. A zero-setback post positions you more directly over the pedals, while a post with greater setback can help if you have long legs or prefer a more stretched-out position. 5. Explore Advanced Features: For mountain bikers and some road riders, a dropper post can be a game-changer. It allows you to adjust the saddle height without stopping, perfect for transitioning between climbs, flats, and descents. While heavier and more expensive, the on-the-fly adjustability can significantly improve control and confidence on varied terrain. 6. Installation: Installing your new seatpost is straightforward. Apply a thin layer of grease (or carbon assembly paste for carbon frames/posts) to the post before inserting it to prevent seizing. Adjust it to your desired height, ensuring it's at least past the minimum insertion mark, then tighten the clamp according to the manufacturer's specifications. In Conclusion, upgrading your bicycle seatpost is a smart way to enhance your riding experience. Whether it's improving comfort through shock absorption, adjusting your fit with the right length and setback, or adding the versatility of a dropper post, the ideal seatpost is out there. Remember to consider your needs, ensure compatibility with your bike, and balance factors like material, weight, and features against your budget for the best upgrade decision.
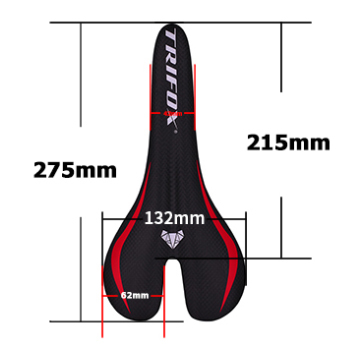
Finding the perfect mountain bike (MTB) saddle for long rides is essential to ensure comfort, performance, and endurance on the trails. The right saddle can make the difference between a grueling ride and an exhilarating adventure. Consider Your Riding Style: Your riding style greatly influences the type of saddle that will suit you best. Cross-country riders often favor narrower saddles that allow for greater pedaling efficiency and reduced chafing. If you’re more into downhill or all-mountain riding, a slightly wider saddle with more padding might be preferable for the added comfort during descents and technical sections. Saddle Shape Matters: Saddles come in various shapes to accommodate different body types and riding positions. Some riders might benefit from a saddle with a flat profile, offering more movement and flexibility. Others might find a curved saddle more supportive, helping to maintain a stable position. Trying out different shapes is key to finding your perfect match. Material and Padding: The materials used in the saddle can affect its overall comfort and durability. A common choice is synthetic covers for their resilience and ease of maintenance, while leather saddles adapt to your shape over time for custom comfort. When it comes to padding, less can actually be more. Overly padded saddles can lead to increased pressure and discomfort on long rides. Look for dense, firm padding that supports without compacting too much. Width and Cutouts: Saddle width should align with the spacing of your sit bones. Most bike shops have tools to measure this, ensuring you choose a saddle that supports you properly. Additionally, some saddles come with cutouts or pressure relief channels aimed at enhancing comfort by reducing pressure on sensitive areas. Test Rides and Adjustments: Many stores offer demo saddles or return policies that allow you to test saddles on your actual rides. Take advantage of these opportunities. Also, remember that minor adjustments in tilt and fore/aft positioning can significantly impact comfort. In conclusion, finding the perfect MTB saddle for long rides involves understanding your riding style, trying different shapes and materials, and ensuring the saddle fits your anatomy correctly. With patience and a bit of experimentation, you’ll discover a saddle that not only enhances your long rides but also improves your overall mountain biking experience.
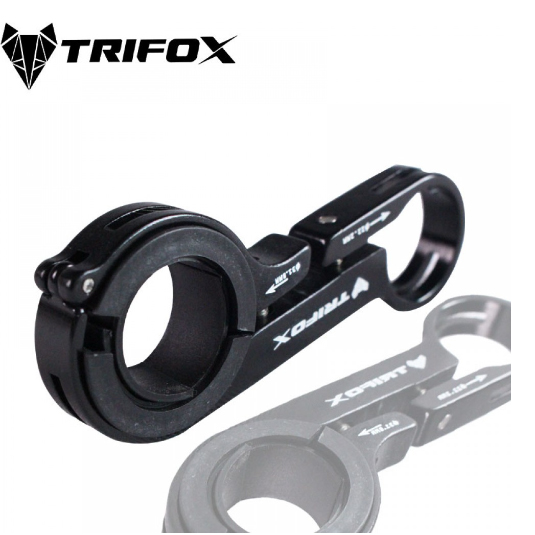
For avid cyclists and casual riders alike, comfort and functionality on long rides are paramount. A bicycle handlebar extender can significantly enhance your riding experience by providing extra space for mounting gadgets, improving control, and offering a more comfortable riding position. Here's how to make the most of this simple yet effective accessory. Why Use a Handlebar Extender? Handlebar extenders are perfect for when you need more room for lights, GPS devices, smartphones, or even a horn. They allow you to keep all your essential gear within easy reach, without cluttering your main handlebar space. Additionally, for those seeking a more upright riding posture, extenders can help alleviate back and neck strain by adjusting the height or angle of your handlebars. Choosing the Right Extender When selecting a handlebar extender, consider the material, length, and diameter. Aluminum extenders offer a great balance between strength and weight, while carbon fiber options provide the ultimate in lightweight durability. Ensure the extender is compatible with your bike's handlebar diameter and offers enough length to accommodate all your accessories. Installation Tips Installing a handlebar extender is a straightforward process that requires minimal tools: Positioning: Decide where you want to place the extender on your handlebars. It should be easily accessible but not interfere with your riding. Attachment: Loosen the screws on the clamp of the extender, wrap it around the handlebar, and then tighten the screws. Make sure it's secure but avoid over-tightening, which can damage the handlebar. Mounting Accessories: Once the extender is in place, start mounting your accessories. Distribute the weight evenly to maintain balance and ensure the bike handles well. Maximizing Comfort and Efficiency With everything installed, take a test ride to adjust the positions of the mounted items for optimal comfort and accessibility. You might find that slight adjustments can make a significant difference in your overall riding experience. Safety Considerations Always ensure that your handlebar extender and mounted accessories do not obstruct your view or interfere with operating the bike. Regularly check that the extender is securely fastened and that there's no movement while riding. In Conclusion A bicycle handlebar extender is a simple upgrade that can vastly improve your cycling experience. By freeing up handlebar space, enhancing control, and allowing for a more comfortable riding position, it's an accessory worth considering for any cyclist looking to make their journeys more enjoyable and efficient.


