


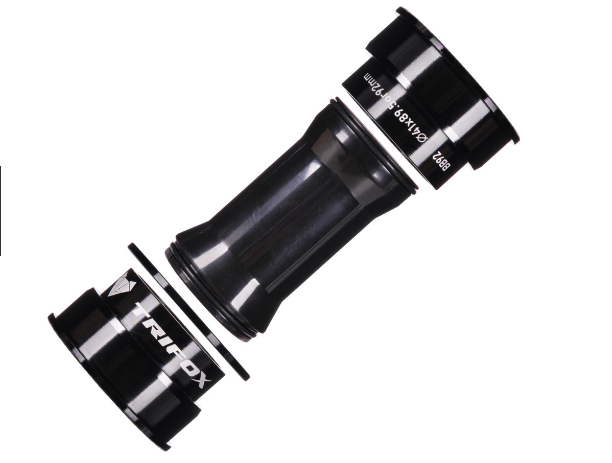
Choosing and installing the ideal road bike bottom bracket (BB) is a pivotal step towards achieving smooth, efficient cycling performance. The bottom bracket is the unsung hero of your bike's drivetrain, sitting stealthily in the frame's BB shell and ensuring your pedal strokes translate into motion with minimal resistance and maximum comfort. With technology evolving, options abound, making the selection process seem daunting. However, understanding the nuances can help you make an informed choice, ensuring your ride benefits from the optimal blend of durability, efficiency, and compatibility. Understanding Bottom Brackets Bottom brackets come in various types, each with specific characteristics suited to different bikes and riding styles. Compatibility with your bike frame and crankset is paramount, alongside considerations like weight, maintenance needs, and performance attributes. Trifox offers a diverse range of bottom brackets designed to meet the high demands of road cycling, blending innovative engineering with high-quality materials to enhance your riding experience. Types of Bottom Brackets Threaded Bottom Brackets: Classic and reliable, threaded BBs screw into the frame's BB shell, offering straightforward installation and maintenance. They're known for their durability and resistance to creaking, making them a favorite among traditionalists and those who value simplicity and longevity. Press-Fit Bottom Brackets: This type has gained popularity for its lighter weight and larger BB shell diameters, which can improve frame stiffness and power transfer. Press-fit BBs require precise installation, as improper fitting can lead to noise or decreased bearing life. BB Standards and Sizes: From BB30 to PF30, BSA, and more, the standard and size of the BB must match your frame's specifications. Trifox's selection caters to these varied standards, ensuring there's an option compatible with virtually any road bike. Choosing Your Bottom Bracket 1. Identify Your Frame's BB Standard: Start by determining the BB standard your frame supports. This information is usually provided by the manufacturer or can be found in your bike's technical specifications. 2. Consider Riding Conditions: Think about the environments where you ride. For rough, wet conditions, a BB with superior sealing might be best to keep out grit and moisture. In contrast, racing on smooth tarmac might prioritize weight savings and reduced friction. 3. Weigh Performance vs. Maintenance: Press-fit options might offer performance gains, but consider if you're willing to deal with potential maintenance issues. Threaded BBs might be slightly heavier but offer ease of maintenance and durability. 4. Quality and Material: Look for high-quality materials and construction. Bearings are the heart of the bottom bracket, so opting for a model with high-quality bearings, like those offered by Trifox, can significantly enhance your bike's performance and longevity. 5. Budget: Finally, factor in your budget. While it's worth investing in a high-quality BB due to its critical role in bike performance, there are options across various price points that offer a good balance of quality and value. Installing Your Bottom Bracket Installing a road bike bottom bracket can be straightforward if you have the right tools and a bit of know-how. Threaded BBs are generally simpler to install than press-fit variants, but both require precision. For Threaded Bottom Brackets: 1. Prepare the Frame: Clean the BB shell thoroughly, removing any dirt or old grease. 2. Apply Grease: Lightly grease the threads on both the BB and the frame. 3. Screw in the BB: Carefully screw in the bottom bracket by hand to avoid cross-threading. Once hand-tight, use the appropriate BB tool to tighten it to the manufacturer's specified torque. For Press-Fit Bottom Brackets: 1. Prepare the Shell: Ensure the BB shell is clean and free of burrs. Some mechanics recommend a light application of retaining compound or grease (depending on the frame material and manufacturer's recommendation). 2. Press in the Cups: Using a BB press tool, align the cups with the BB shell and press them in evenly, ensuring they are straight and fully seated. Regardless of the type, always refer to the bottom bracket and frame manufacturer's guidelines for specific installation instructions, torque settings, and maintenance advice. Conclusion Selecting and installing the ideal road bike bottom bracket is essential for a smooth, efficient cycling experience. By understanding the different types and considerations involved in choosing a BB, you can ensure your bike is equipped to deliver top performance on the road. Trifox's range of high-quality bottom brackets offers cyclists a variety of options tailored to different needs and preferences, enabling a custom fit for your ride. Proper installation is key to maximizing the benefits of your chosen BB, so take the time to do it right or consult a professional mechanic to ensure optimal performance and longevity of your cycling investment. With the right bottom bracket, your road bike will provide countless miles of smooth, efficient, and enjoyable rides.
Riding comfort is a crucial aspect of cycling, whether you're a daily commuter, a weekend warrior, or a competitive cyclist. The right bicycle seat cushion can significantly enhance your riding experience, allowing you to cover longer distances more comfortably and enjoyably. One standout option for those seeking to upgrade their ride is the Carbon Bike Saddle CS100, which promises enhanced riding comfort among other benefits. The Importance of Riding Comfort Comfort on the bike is about more than just enjoying your rides. It's also about preventing injuries, reducing fatigue, and improving performance. A seat cushion that doesn't suit your body can lead to discomfort, pain, and even long-term health issues. Therefore, selecting the right bicycle seat cushion is a decision that should not be taken lightly. Introducing the Carbon Bike Saddle CS100 The Carbon Bike Saddle CS100 offers a combination of high-quality materials, design excellence, and comfort-enhancing features. It's designed to cater to the needs of diverse riders, providing a comfortable platform that supports longer and more enjoyable rides. Enhanced Riding Comfort At the heart of the CS100's appeal is its promise of enhanced riding comfort. This is achieved through a meticulously designed ergonomic shape that supports the sit bones while minimizing pressure on soft tissues. The use of carbon in the saddle's construction also plays a crucial role. Carbon is known for its ability to dampen vibrations, offering a smoother ride over rough surfaces. Top Quality Items for Less Investing in a high-quality saddle like the CS100 doesn't have to break the bank. It represents excellent value for money, ensuring that riders can access top-notch comfort and performance features without a hefty price tag. This accessibility means that more cyclists can experience the benefits of a premium seat cushion, enhancing the overall quality of their rides. 24/7 Live Chat Support Selecting the right saddle can be daunting, but the availability of 24/7 live chat support with the CS100 ensures that riders can make informed decisions. Whether you have questions about compatibility, installation, or simply want advice on the best option for your riding style, expert assistance is always at hand. Fast & Reliable Delivery Options Once you've decided on the CS100, fast and reliable delivery options mean you won't have to wait long to enjoy your upgraded ride. This convenience minimizes downtime and gets you back on the road or trail with minimal delay. Multiple Safe Payment Methods With various safe payment methods available, purchasing the CS100 is straightforward and secure. This range of options ensures that the buying process is hassle-free, letting you focus on the excitement of enhancing your riding experience. Selecting the Right Seat Cushion While the Carbon Bike Saddle CS100 offers numerous benefits, ensuring it's the right fit for you is essential. Here are some factors to consider when choosing any bicycle seat cushion: Body Geometry: Consider your sit bone width and the type of riding you do. A properly sized saddle will support your sit bones without causing pressure on soft tissues. Material: Materials like carbon fiber offer a good balance of stiffness (for efficient power transfer) and vibration damping (for comfort).Shape and Cutouts: Some riders prefer saddles with a central cutout to reduce pressure and enhance breathability. Others may find a solid saddle more comfortable. It's about personal preference and finding what works best for you. Compatibility: Ensure the saddle fits your bike's seat post and aligns with your desired riding position. Some saddles are designed with a particular posture in mind, from upright to aggressive racing stances. Conclusion Enhancing your riding comfort with the right bicycle seat cushion is a game-changer for any cyclist. The Carbon Bike Saddle CS100 stands out as an excellent choice, offering a blend of quality, comfort, and value that can elevate your cycling experience. By considering your unique needs and the features that contribute to saddle comfort, you can make an informed choice that ensures every ride is a pleasure. Remember, the right saddle is out there for everyone; it's just a matter of finding it.
Selecting the perfect cyclocross wheelset with rim brakes for competitive racing is a critical decision that can dramatically influence your performance, comfort, and results on the course. Cyclocross challenges riders with a unique blend of varied terrain, tight corners, steep hills, and obstacles that demand both skillful riding and top-notch equipment. In this context, your wheelset is not just part of your bike; it's part of your competitive edge. The Trifox WT17 Carbon Wheelset emerges as a standout choice for riders seeking to elevate their cyclocross racing experience. Here’s how to make an informed selection tailored to the demanding nature of cyclocross racing. Understanding Wheelset Specifications The Trifox WT17 Carbon Wheelset, built from 100% ultra-lightweight carbon fiber with a UD matte finish, presents an optimal blend of durability, aerodynamics, and lightweight performance. Its 25mm outer width and 18mm inner width are compatible with 700 x 25C clincher tires, offering versatility for various cyclocross conditions. When choosing a cyclocross wheelset, consider these essential specifications for competitive racing: Material and Construction: Carbon fiber, due to its strength-to-weight ratio and vibration-damping properties, offers significant advantages over aluminum, especially in rough cyclocross courses where weight savings and comfort are crucial. Width and Tire Compatibility: A wider rim can accommodate broader cyclocross tires, providing better traction and control on mixed surfaces. The compatibility of the Trifox WT17 with 700 x 25C tires ensures you can select tires that best match race conditions and personal preference. Rim Depth: While the Trifox WT17 comes in 45mm, 50mm, and 60mm depth options, consider how rim depth affects performance. Deeper rims offer aerodynamic benefits on faster, more open courses, while shallower rims may perform better in windy conditions or on courses with frequent turns and accelerations. Performance Features for Cyclocross Rim Brake Compatibility: For cyclists sticking with the reliability and simplicity of rim brakes, the Trifox WT17’s compatibility ensures optimal braking performance, even in the gritty and wet conditions often encountered in cyclocross. Spoke Configuration: The straight-pull Pillar spokes and nipple design—20 holes in the front wheel and 24 in the rear—balance weight savings with the resilience needed to tackle rough cyclocross terrains without sacrificing structural integrity. Hub Quality: The Trifox T17 aluminum alloy hubs, coupled with high-quality LLU contact hub bearings (two in the front hub and four in the rear), ensure smooth rolling and durability through muddy courses and power washings. The quick-release design facilitates easy wheel removal for cleaning and transportation. Making the Selection When choosing a cyclocross wheelset like the Trifox WT17, consider the following steps to guide your decision: Evaluate Your Needs: Reflect on your specific requirements based on racing experience, course characteristics, and personal preferences.Research and Compare: Investigate various wheelsets, focusing on those designed specifically for cyclocross and rim brake systems. Compare their features, benefits, and limitations. Consider the Conditions: Anticipate the typical conditions of your cyclocross races. A versatile wheelset that performs well across a range of conditions can be a valuable asset. Budget and Value: Balance cost with the performance benefits. While higher-end wheelsets like the Trifox WT17 offer significant advantages, ensure they align with your budget and racing goals. Conclusion Choosing the right cyclocross wheelset, such as the Trifox WT17 Carbon Wheelset, involves careful consideration of various factors—from material and rim width to depth and brake compatibility. By focusing on a wheelset tailored to the unique demands of cyclocross racing, you can secure a competitive advantage that supports your racing ambitions. With its blend of lightweight performance, durability, and versatility, the Trifox WT17 represents an excellent choice for racers committed to achieving their best on the cyclocross course.
Choosing the best 700c tubeless rim brake wheelset for your road bike is a critical decision that can significantly impact your riding experience. Whether you're a competitive racer, an avid enthusiast, or someone who enjoys leisurely rides on the weekend, the right wheelset can enhance performance, comfort, and enjoyment. Tubeless technology, combined with the traditional reliability of rim brakes, offers a combination that many cyclists find irresistible. Understanding the Basics Before diving into the selection process, it's essential to understand what makes a 700c tubeless rim brake wheelset stand out: 700c Wheels: The term "700c" refers to the diameter of the wheels, which is standard for most road bikes. This size strikes a balance between speed, efficiency, and handling. Tubeless Technology: Tubeless wheels allow you to ride without inner tubes. This setup reduces weight, allows lower tire pressures for improved comfort and traction, and decreases the risk of punctures. Rim Brakes: Rim brakes provide stopping power through brake pads pressing against the rims of the wheels. They are lightweight, easy to maintain, and offer consistent performance in dry conditions. Why Go Tubeless? The benefits of going tubeless include reduced weight, improved ride quality, and fewer flat tires. Without a tube, you eliminate the risk of pinch flats and can run lower tire pressures, which increases traction and absorbs road vibrations. Plus, the sealant used in tubeless setups can quickly seal small punctures, keeping you rolling without interruption. Selecting Your Wheelset When choosing a 700c tubeless rim brake wheelset for your road bike, consider the following factors: 1. Rim Material Aluminum: Offers a great balance of strength, weight, and affordability. Ideal for everyday riding and training. Carbon Fiber: Lighter and stiffer than aluminum, carbon wheels can improve acceleration and climbing. They're preferred for racing and high-performance riding but come at a higher cost. 2. Rim Width and Depth Width: A wider rim supports wider tires, which can offer better traction and comfort. Make sure the rim width is compatible with your frame and brake setup. Depth: Deeper rims are more aerodynamic but can be affected by crosswinds. Shallow rims are lighter and offer more stability in windy conditions. 3. Tubeless Compatibility Ensure the wheelset is explicitly designed for tubeless use. This means it should have a rim bed without spoke holes (or covered by a rim strip) and a specific bead lock design to securely hold the tire without an inner tube. 4. Brake Surface For rim brake wheelsets, the quality of the brake surface is crucial. Look for wheels with durable, heat-resistant brake tracks to ensure reliable braking performance and longevity. 5. Hub Quality Hubs play a significant role in the overall performance of the wheelset. High-quality hubs offer smoother rolling, better durability, and easier maintenance. Consider wheelsets with sealed bearing hubs for the best experience. 6. Weight Lighter wheels accelerate faster and make climbing easier. However, the lightest option isn't always the best choice. Balance weight with other factors like durability and aerodynamic performance based on your specific riding needs. 7. Brand Reputation and Warranty Choose a wheelset from a reputable brand known for quality and reliability. Additionally, consider the warranty and customer service support, as these can be invaluable if you encounter any issues. Installing Your New Wheelset Once you've selected your 700c tubeless rim brake wheelset, proper installation is key to enjoying the benefits. Here's a quick guide: Prepare the Wheels: If not pre-installed, apply the tubeless rim tape snugly, covering all spoke holes. Install the tubeless valve stem. Mount the Tires: Apply a thin layer of tubeless sealant on the inside of the tire before mounting it on the rim. Ensure the tire bead is seated correctly. Inflate the Tires: Inflate the tires to pop the bead into place. You'll often hear a series of "pops" as the tire seats properly. Adjust the Brakes: With the new wheels installed, you may need to adjust your rim brakes to accommodate the width and profile of the new rims. Conclusion Choosing the best 700c tubeless rim brake wheelset for your road bike involves considering various factors, including material, rim dimensions, tubeless compatibility, and overall quality. By carefully selecting a wheelset that matches your riding style and needs, you can significantly enhance your cycling experience. Remember, the right wheelset not only improves performance but also boosts your enjoyment of the sport, making every ride more enjoyable and rewarding.
Upgrading your bike with a new wheelset is one of the most impactful changes you can make, significantly improving performance, weight, and aesthetics. This is especially true for bikes equipped with rim brakes, where the choice of wheels plays a crucial role in braking efficiency and overall riding experience. Understanding Wheelset Upgrades A wheelset upgrade involves replacing your bike's current front and rear wheels with a new set. This can lead to improvements in speed, handling, and comfort. For bikes with rim brakes, the new wheels must be compatible with this braking system, meaning they need to have a brake track suitable for the brake pads to clamp onto. Why Upgrade? Weight Reduction: Lighter wheels reduce the rotational mass, making it easier to accelerate and climb. Increased Rigidity: A stiffer wheelset offers better power transfer from your pedaling effort to the road. Improved Aerodynamics: Some wheelsets are designed to cut through the air more efficiently, which can help you ride faster with less effort. Enhanced Durability: High-quality wheels can better withstand the rigors of road or trail riding, potentially offering longer life and better reliability. Selecting Your New Wheelset When choosing a new wheelset for a bike with rim brakes, consider the following factors: Brake Compatibility: Ensure the wheels are designed for rim brakes. The braking surface must be smooth and durable to work effectively with your brake pads. Rim Material: Common materials include aluminum, which offers a good balance of weight, cost, and performance, and carbon fiber, which is lighter and stiffer but usually more expensive. Wheel Size: Match the wheel diameter to your current setup (common sizes include 700c for road bikes and 29" or 27.5" for mountain bikes) to ensure compatibility with your bike frame and tires. Rim Width: Wider rims can accommodate wider tires, which may offer better traction and comfort. Make sure the width is compatible with your bike frame and brake setup. Hub Compatibility: Check that the wheel hubs are compatible with your bike's axle dimensions and, if applicable, your drivetrain's cassette. Installing Your New Wheelset Once you've selected your new wheelset, installation is the next step. While professional installation is recommended if you're unsure, many cyclists find this to be a manageable DIY project. Remove Old Wheels: Open the rim brake calipers to release tension (this might involve lifting a small lever or unscrewing a bolt, depending on your brake model). Then, release the quick-release lever or unscrew the thru-axle to remove the wheels. Transfer Components: If your new wheelset doesn't come with a cassette (for the rear wheel) or rotors (if using disc brakes), you'll need to transfer these from your old wheels. You'll also need to move your tires over unless you're upgrading those as well. Install New Wheels: Insert the new wheels into the frame, ensuring they're seated correctly in the dropouts. Tighten the quick-release lever or thru-axle securely. Adjust Brakes: With the new wheels in place, you may need to adjust your rim brakes to ensure they properly contact the new wheels' braking surface. This typically involves adjusting the brake pads' height and alignment, as well as the tension in the brake cables. Final Checks and Adjustments Before taking your upgraded bike for a spin, perform a few final checks: Spin each wheel to ensure it rotates smoothly and doesn't rub against the brake pads. Check the brake function by squeezing the levers; the brakes should engage firmly and evenly. Make sure all bolts, including those on the brake calipers and the wheels' quick-release levers or thru-axles, are tightened to the manufacturer's specifications. Conclusion Upgrading your bike with a new wheelset designed for rim brakes can transform your riding experience, offering benefits in weight, performance, and aesthetics. By carefully selecting a wheelset that meets your needs and ensuring proper installation, you can enjoy the enhanced performance and renewed pleasure in your rides. Remember, while the process can be straightforward, don't hesitate to seek professional assistance if you're unsure about any steps. Happy riding!
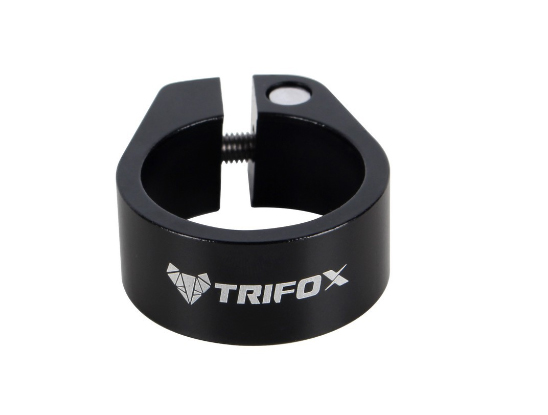
The seatpost clamp may seem like a small component in the grand scheme of a bicycle, but its role is crucial. It secures the seatpost at the desired height, ensuring that your ride is both comfortable and stable. Whether you're upgrading, replacing, or setting up a new bike, choosing the right seatpost clamp, like the Trifox seatpost clamp SC35, and installing it correctly is key. Here's how to do it. Understanding Seatpost Clamps Seatpost clamps come in various designs and materials, each offering different benefits. Aluminum alloy, for example, is praised for its blend of lightweight and durability, making it a popular choice among cyclists. When selecting a seatpost clamp, consider factors such as material, diameter compatibility, and locking mechanism (bolt-on or quick-release). Selecting the Right Size The most critical step in choosing a seatpost clamp is ensuring it matches the diameter of your bike's seat tube (not the seatpost itself). This measurement is crucial because an incorrect size will either not fit or fail to secure the seatpost properly. For instance, the Trifox seatpost clamp SC35 is designed for a specific seat tube diameter, so verifying compatibility with your bike frame is essential. Material and Design Opt for a seatpost clamp made from durable materials like aluminum alloy, which provides an excellent balance between strength and weight. The design also plays a role in the overall aesthetics of your bike and the ease of installation. Some clamps feature a quick-release mechanism for easy adjustment, while others use a bolt-on design for a more secure hold. Installation Steps Once you've selected the appropriate seatpost clamp, installing it correctly ensures it performs its function without damaging your bike. Here are the general steps, taking the Trifox seatpost clamp SC35 as an example: Measure for Compatibility: Double-check the diameter of your bike's seat tube to ensure the clamp fits perfectly. Clean the Area: Before installation, clean the seatpost and the inside of the seat tube to remove any dirt or debris. This promotes a secure fit and prevents slippage. Position the Clamp: Slide the seatpost clamp onto the seatpost, then insert the seatpost into the seat tube to your desired height. Adjust the positioning of the clamp so it sits flush against the top of the seat tube. Tighten Securely: If your clamp uses a bolt-on mechanism, like the SC35, use an Allen key or wrench to tighten it. Ensure it's snug but avoid overtightening, as excessive force can damage the clamp or the frame. Check for Stability: After tightening, gently try to move the seatpost with your hands. If there's no movement, you've secured it properly. If it moves, tighten the clamp a bit more and retest. Final Thoughts A well-chosen seatpost clamp, such as the Trifox seatpost clamp SC35, enhances your cycling experience by ensuring your seat stays at the perfect height and angle for your riding comfort and efficiency. Remember, the key to a successful selection and installation lies in knowing the correct size for your bike, choosing quality materials, and following the proper installation steps. By paying attention to these details, you can enjoy a stable and comfortable ride, whether you're navigating city streets or embarking on off-road adventures. Remember, the small components make a big difference in the performance and enjoyment of your bike, so choose wisely and install carefully.
In the world of cycling, every detail counts towards achieving the perfect ride. From the frame of your bike down to the accessories, like a bottle holder, each component plays a vital role in enhancing your cycling experience. Today, we're focusing on a seemingly small but significantly impactful accessory: the super light bike bottle holder. Specifically, we'll guide you through choosing and installing a Trifox Bike Bottle Holder, known for its high-quality goods at affordable prices. Why Choose a Super Light Bike Bottle Holder? Hydration is key to maintaining performance and endurance during rides, making easy access to your water bottle essential. A super light bike bottle holder not only ensures that your drink is always within reach but also contributes to the overall lightweight setup of your bike. Reducing weight where possible can lead to a more enjoyable ride, whether you're climbing steep hills or racing down country lanes. Selecting the Right Bottle Holder When it comes to selecting a bottle holder, there are several factors to consider: Material: Carbon fiber bottle holders, such as the CBC100 and CBC200 offered by Trifox, are incredibly lightweight and durable. They provide a secure grip on your bottle, ensuring it stays in place during bumpy rides, all while contributing minimally to the weight of your bike. Compatibility: Ensure the bottle holder fits the size of your bike's frame and is compatible with the diameter of your bottles. Most holders are designed to accommodate standard sizes, but it's always best to check. Ease of Access: Consider how easily you can retrieve and replace your bottle while riding. The design should allow for quick access without distracting you from the road ahead. Aesthetics: While not as crucial as functionality, choosing a bottle holder that complements the look of your bike can enhance your overall satisfaction. Trifox Bike Bottle Holder: A Top Choice Trifox offers a range of bike accessories, including the CBC100 and CBC200 carbon bike water bottle cages, which stand out for their quality and affordability. These bottle holders are crafted from carbon fiber, offering an optimal balance of strength, durability, and lightness. Plus, with Trifox's commitment to providing high-quality goods at competitive prices, you're getting great value for your investment. Installing Your Trifox Bike Bottle Holder Installation is straightforward and requires only a few tools, such as a hex wrench. Follow these steps for a successful setup: Locate the Mounting Points: Most bikes have pre-drilled holes in the frame for attaching a bottle holder. Locate these on your bike—they're usually found on the down tube or the seat tube. Position the Bottle Holder: Hold the Trifox bottle holder against the mounting points to determine the correct orientation. Ensure it's positioned for easy access while riding. Secure the Holder: Use the screws provided with your Trifox bottle holder, and a hex wrench, to attach the holder to the frame. Tighten the screws until the holder is securely in place but be careful not to overtighten and damage the frame or holder. Test the Fit: Once installed, test the fit by inserting a water bottle into the holder. It should slide in easily and stay secure even when you shake the bike gently. Enjoying the Benefits With your Trifox bottle holder installed, you'll enjoy the benefits of having a reliable, lightweight solution for staying hydrated on your rides. Not only does it fulfill a practical need, but it also adds a touch of style to your bike, thanks to its sleek carbon fiber construction. Conclusion Choosing and installing a super light bike bottle holder is a simple yet effective way to enhance your cycling experience. With options like the Trifox CBC100 and CBC200, you can enjoy the benefits of advanced materials like carbon fiber, ensuring your rides are lighter, faster, and more enjoyable. Remember, staying hydrated is crucial for peak performance, and having a reliable, accessible bottle holder is key to achieving this. So, equip your bike with a Trifox bottle holder and elevate your cycling adventures. Whether you're a seasoned cyclist or just starting out, investing in the right accessories can make all the difference. And with free shipping for orders over $50 and secure payment options provided by Trifox, upgrading your bike has never been easier or more affordable.
Mountain biking is an exhilarating sport that offers the freedom to explore nature, tackle challenging terrains, and push your limits. An essential component that significantly affects your mountain bike's performance is the freehub. It's responsible for driving your bike forward without pedaling and plays a crucial role in shifting gears. Ensuring your MTB freehub is compatible with your bike not only enhances your riding experience but also prevents mechanical failures. Here’s how you can check and match MTB freehub compatibility for your mountain bike. Understanding Freehubs Before diving into compatibility, it's crucial to understand what a freehub is. A freehub is part of the rear hub on your bike, housing the mechanism that allows the wheel to spin freely when you're not pedaling. It also includes the splines where the cassette (the set of gears) mounts. Identifying Your Freehub Type The first step in checking compatibility is identifying your freehub type. There are several types of freehubs, but the most common in mountain biking are Shimano, SRAM XD, and Micro Spline. Shimano: Known for its reliability, the Shimano freehub design has been a standard in the cycling world. It accommodates cassettes with up to 11-speeds on most models. SRAM XD: Designed for the SRAM XX1 groupset, the XD driver is lighter and allows for a more extensive range of gears, accommodating a 10-tooth smallest cog. Micro Spline: Introduced by Shimano for their 12-speed systems, Micro Spline enables the use of a 10-tooth smallest cog and features a new interface for better engagement and durability. To identify your freehub type, remove your rear wheel and cassette to expose the freehub. The shape of the splines and the mounting system can help you determine the type. Checking Compatibility Once you've identified your freehub type, the next step is to check its compatibility with your mountain bike. Here are key factors to consider: Cassette Compatibility: Ensure that your cassette matches the freehub type. For example, a Shimano cassette won't fit on an SRAM XD freehub without an adapter. Speed Compatibility: The number of speeds on your cassette should match the freehub's capability. Mixing different speeds (e.g., using an 11-speed cassette on a freehub designed for 9-speed) might work temporarily but can lead to poor shifting performance and increased wear. Hub and Frame Compatibility: The overall hub width must match your bike frame's specifications. Mountain bikes commonly use hubs that are 135mm, 142mm, or 148mm (Boost) wide. Ensure your freehub and hub assembly align with your frame's requirements. Matching Components After ensuring compatibility, matching your components is straightforward. When purchasing a new freehub or cassette, pay close attention to the specifications: For Shimano and Micro Spline: Look for the specific model that matches your drivetrain's speed and ensure it fits the hub's width.For SRAM XD: Verify that the freehub is labeled as XD-compatible and matches the speed and hub width of your setup. It's also worth considering the material and build quality of the freehub, as these can affect weight, durability, and performance. Professional Help If you're unsure about compatibility or how to proceed with swapping components, seeking professional help from a bike mechanic is advisable. They can provide valuable insights, recommend compatible parts, and even handle the installation for you. Conclusion Matching your MTB freehub with your mountain bike is crucial for optimal performance and durability. By understanding the different types of freehubs, checking compatibility with your bike's specifications, and carefully selecting matching components, you can ensure a seamless and enjoyable riding experience. Remember, when in doubt, consult a professional to avoid costly mistakes and ensure your mountain bike is in top condition for your next adventure.

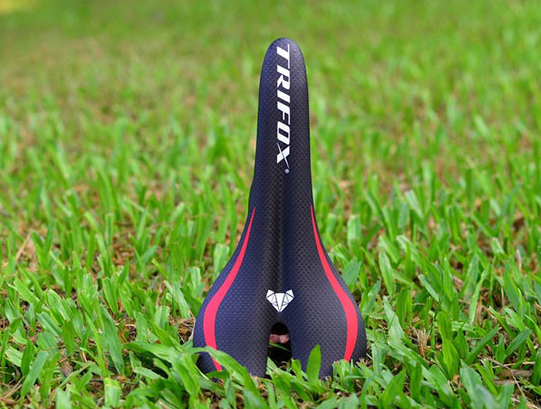
The saddle is arguably one of the most critical components of a bicycle, directly affecting your comfort, performance, and overall riding experience. With the myriad of options available in the market, choosing the perfect saddle can seem like a daunting task. However, when it comes to versatility and comfort, round saddles often emerge as the preferred choice for many cyclists across different disciplines. Understanding Round Saddles Round saddles are characterized by their rounded profile when viewed from the side. This shape provides a balanced distribution of pressure and supports the sit bones effectively, making them suitable for riders with a dynamic riding position or those who shift positions frequently. They're especially favored by road cyclists, mountain bikers, and endurance riders for their adaptability and comfort over long distances. Step 1: Assess Your Riding Style The first step in selecting the perfect saddle is to understand your primary riding style. Are you a road cyclist who values speed and aerodynamics? A mountain biker tackling rough trails? Or perhaps an endurance rider focused on comfort over long distances? Your riding discipline will influence your saddle choice, as different styles prioritize different features such as weight, cushioning, and shape. Step 2: Consider Saddle Width and Sit Bone Measurement One of the most crucial factors in saddle selection is width. A saddle that's too narrow won't support your sit bones properly, while one that's too wide can cause chafing and restrict leg movement. The key is to measure the distance between your sit bones and choose a saddle width that offers adequate support without compromising mobility. Most bike shops offer sit bone measurement services, or you can do it at home using a simple cardboard method. Step 3: Look for Quality Materials The materials used in the saddle's construction play a significant role in its durability, comfort, and weight. Leather saddles, for example, offer exceptional comfort and durability as they mold to your body over time. However, they require more maintenance and have a higher price tag. Synthetic materials are lighter and require less maintenance but might not provide the same level of comfort as leather. Additionally, consider the rail material—aluminum, steel, carbon fiber—to balance weight and strength according to your needs. Step 4: Evaluate Padding and Cutouts The right amount of padding in a saddle can make a significant difference in comfort. Generally, a firmer padding is preferable for longer rides and competitive cycling, as it provides better support. For casual riders or those who prefer softer support, a saddle with more cushioning might be more comfortable. Additionally, some round saddles come with cutouts or pressure relief channels designed to reduce pressure on sensitive areas, which can be a game-changer for some riders. Step 5: Test Before You Buy Perhaps the most important advice when selecting a saddle is to test it before making a commitment. Many bike shops offer demo saddles that you can try on your bike for a few days. Take advantage of these opportunities to get a real feel for how the saddle performs on the road or trail. Pay attention to any discomfort, pressure points, or mobility issues during the test period. Conclusion Selecting the perfect round saddle for your riding style and comfort is a personalized process that requires consideration of several factors, including riding discipline, sit bone width, material preferences, and individual comfort needs. By following the steps outlined above, you're well on your way to finding a saddle that not only enhances your riding experience but also supports your performance goals and comfort needs. Remember, the ideal saddle is one that you barely notice because it fits so well with your body and riding style. Don't be afraid to spend time testing different models and asking for advice from experienced cyclists or professionals at your local bike shop. After all, a well-chosen saddle is an investment in countless hours of enjoyable and comfortable riding.


