


Ensuring a leak-free ride when using tubeless tires largely depends on the correct application of rim tape. This essential component not only seals the spoke holes on your rim but also provides a smooth surface for the tire to adhere to, making it crucial for preventing air loss and maintaining tire pressure. Mastering the art of applying tubeless tire rim tape can seem daunting at first, but with the right guidance, you can achieve a perfect setup that will enhance your cycling experience. 1. Gather Your Materials Before starting, ensure you have the necessary materials on hand: - Tubeless rim tape of the correct width and length for your rims - Scissors or a sharp blade - Alcohol wipes or a clean cloth and isopropyl alcohol - A tubeless valve - Optional: Heat gun or hairdryer 2. Prepare the Rim The key to a successful tape application starts with a clean rim. Use alcohol wipes or a cloth dampened with isopropyl alcohol to thoroughly clean the rim's surface, focusing on the area where the tape will adhere. This removes grease, dirt, and old adhesive residues, ensuring a strong bond between the tape and the rim. Allow the rim to dry completely before proceeding. 3. Choose the Correct Tape Width Selecting the right tape width is crucial for an effective seal. The tape should cover the entire inner width of the rim, extending slightly up the sidewalls but without encroaching on the area where the tire bead sits. Typically, the tape width should be 2-3mm wider than the internal width of your rim. This ensures complete coverage of the spoke holes and provides a sufficient sealing surface. 4. Start Applying the Tape Begin by locating the valve hole on your rim. Position the end of the tape approximately 10cm (about 4 inches) to one side of this hole, pressing the tape firmly onto the rim. Slowly unroll the tape, stretching it slightly as you go to ensure it lays flat and adheres tightly. It's important to keep tension on the tape to avoid wrinkles or air bubbles, which could compromise the seal. As you apply the tape, make sure it's centered and extends slightly up the sidewalls. Use your fingers or a small roller to smooth out the tape and firmly press it into place, paying extra attention to the area around the spoke holes. 5. Overlap and Cut Once you've made a complete circuit of the rim, overlap the starting point by at least 15cm (about 6 inches) to ensure a secure seal. Cut the tape cleanly with scissors or a sharp blade. Firmly press down on the overlapping section to eliminate any potential gaps. 6. Create a Valve Hole Locate the valve hole beneath the newly applied tape. Using a small, sharp object, carefully make a hole through the tape at this location. The hole should be just large enough to fit the valve stem through—too large of a hole can lead to leaks. Insert the tubeless valve through the hole, ensuring a tight fit. The rubber base of the valve should sit flush against the tape, creating an airtight seal. 7. Seal and Finish For added durability and to ensure the tape adheres securely to the rim, consider gently heating the taped area with a heat gun or hairdryer. This softens the adhesive, allowing it to bond more deeply into the rim's surface. Once heated, go over the tape once more with firm pressure to ensure it's fully adhered. After the tape is applied and the valve is in place, mount your tubeless tire onto the rim and inflate it according to the manufacturer's recommendations. The air pressure will help push the tape into place, further enhancing the seal. 8. Test for Leaks Finally, it's crucial to test your setup for leaks. Submerge the rim and tire in water or spray soapy water along the rim and valve areas. Watch for any air bubbles that indicate a leak. If leaks are found, deflate the tire and reapply pressure to the tape or consider adding an additional layer of tape if necessary. Applying tubeless tire rim tape correctly is vital for achieving a leak-free ride. By following these steps, you can ensure a robust and durable seal that will hold up under the rigors of your cycling adventures. Proper preparation, careful application, and thorough testing are the keys to success, allowing you to enjoy the benefits of tubeless tires with confidence.
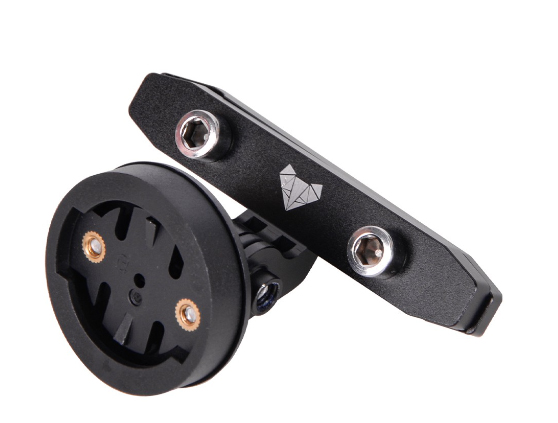
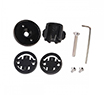
A bike board, often referred to as a bikepacking or adventure board, is essentially a platform that allows cyclists to attach gear, supplies, or even additional seating to their bikes. This versatile accessory makes it possible to transform your regular bike into a cargo-carrying beast, perfect for those who love to explore the great outdoors. Choosing the Right Bike Board 1. Consider Your Bike Type and Size The first step in selecting a bike board is to consider the type of bike you have. Different boards are designed to fit various types of bikes such as mountain bikes, road bikes, and touring bikes. Additionally, ensure that the board is compatible with the size of your bike frame to avoid any fitting issues. 2. Evaluate the Board's Weight Capacity Before making a purchase, check the weight capacity of the bike board. It's crucial to choose a board that can handle the load you plan to carry. Overloading a bike board can lead to handling difficulties and potentially damage your bike. 3. Material Matters Bike boards are typically made from materials like aluminum, plastic, or carbon fiber. Aluminum boards are durable and relatively lightweight, making them a popular choice for many cyclists. Plastic boards may be lighter but less durable, whereas carbon fiber offers the best strength-to-weight ratio but at a higher price point. 4. Ease of Installation Look for a bike board that offers easy installation and removal. Some boards come with quick-release systems, allowing you to attach or detach the board without tools, which is especially handy if you're frequently switching between cargo-carrying and standard biking modes. Using Your Bike Board for Outdoor Adventures 1. Packing Smart When loading up your bike board, distribute the weight evenly to maintain balance. Heavier items should be placed closer to the bike frame, while lighter items can be positioned further out. This helps in keeping the bike stable and manageable, even on rough terrains. 2. Securing Your Load Use bungee cords, straps, or cargo nets to secure your gear to the bike board. Ensure everything is tightly fastened to prevent items from shifting or falling off during your ride. It's also a good idea to check the security of your load periodically, especially after riding through bumpy sections. 3. Protecting Your Gear Consider using waterproof bags or covers to protect your gear from the elements. Sudden rain showers or muddy trails can quickly soak or dirty your belongings, so it's best to be prepared. 4. Planning Your Route With additional weight on your bike, it's important to plan your route accordingly. Opt for paths that are suitable for the added load, avoiding overly technical trails that could pose a challenge. Remember, the goal is to enjoy the journey as much as the destination. 5. Practice Makes Perfect Before embarking on a long adventure, take a few short trips with your loaded bike board to get used to the handling differences. Practice maneuvering, braking, and turning with the extra weight. This will help you feel more confident and safe during your outdoor excursion. 6. Respect the Environment While exploring the great outdoors, always follow Leave No Trace principles. Pack out what you pack in, minimize your impact on the environment, and respect wildlife and other trail users. 7. Be Prepared for Emergencies Carry a basic repair kit, including tools for fixing flat tires, adjusting the bike board, and tightening bolts. Also, bring a first aid kit, extra water, and snacks. Being prepared can make all the difference in handling unexpected situations. Choosing and using a bike board for your next outdoor adventure opens up a world of possibilities for exploration and fun. By carefully selecting the right board for your needs and following these tips for effective use, you'll be well-equipped to embark on memorable journeys across diverse landscapes. Whether you're planning a multi-day bikepacking trip or a day-long excursion, a bike board can enhance your adventure, allowing you to carry everything you need to explore the great outdoors to its fullest.

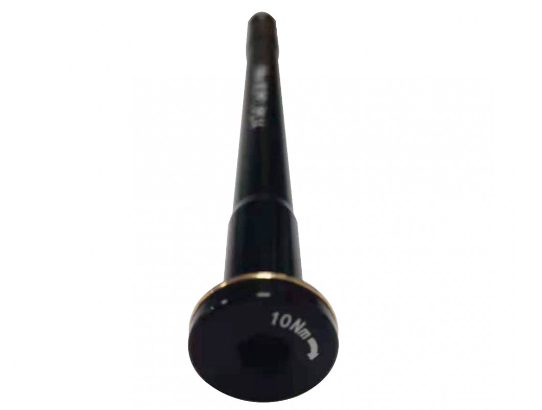
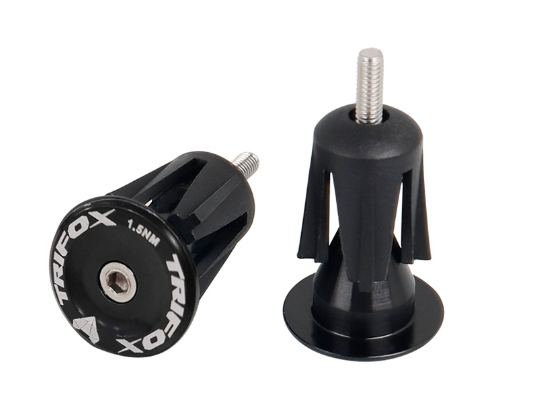
In the world of cycling, the smallest components often make the most significant difference in performance and safety. One such component is the thru-axle skewer, a critical piece of hardware that secures your wheels to your bike, ensuring stability, improving performance, and enhancing rider safety. Understanding Thru-Axle Skewers Thru-axle skewers are an evolution from the traditional quick-release system, offering a more robust and reliable method for securing bike wheels. Unlike quick releases, which clamp onto the bike frame using a cam mechanism, thru-axles thread directly into the bike frame or fork. This design significantly improves wheel stiffness and bike handling, especially in demanding conditions like mountain biking or road racing. Benefits of Upgrading to a Thru-Axle Skewer Enhanced Stability and Control: The rigidity provided by a thru-axle skewer reduces flex in the wheel, allowing for more precise control over rough terrain or during high-speed descents. Improved Safety: Thru-axles offer a more secure connection between the wheel and the bike frame, reducing the risk of the wheel becoming dislodged during a ride. Better Performance: The added stiffness helps to transfer power more efficiently from the rider to the wheels, improving acceleration and climbing performance. Compatibility with Modern Disc Brakes: Thru-axles ensure that wheels are precisely aligned, which is crucial for the optimal performance of disc brake systems. Choosing the Right Thru-Axle Skewer When shopping for a thru-axle skewer, consider the following factors: Compatibility: Ensure that the skewer is compatible with your bike's frame and fork dimensions. The Trifox Alloy Front Thru Axle Skewer, for example, is designed for boost forks, a common specification for modern mountain bikes. Material: Look for lightweight yet durable materials. The Trifox skewer is made from high-quality alloy, offering an excellent balance of strength and weight reduction. Ease of Use: Choose a skewer that can be easily installed and removed without requiring excessive force or tools. This is particularly important for cyclists who travel with their bikes or those who might need to remove wheels frequently for maintenance. Installing Your Thru-Axle Skewer Step 1: If replacing an existing skewer, first remove the old axle by unscrewing it from the frame or fork. Step 2: Insert the new thru-axle skewer through the hub of the wheel. Align the wheel within the dropouts of the fork or frame. Step 3: Thread the skewer into the receiving end of the dropout. Ensure it is threaded straight to avoid cross-threading. Step 4: Tighten the skewer according to the manufacturer's recommended torque settings. For the Trifox Alloy Front Thru Axle, a snug fit that allows the lever to close firmly without excessive force is ideal. Step 5: Perform a safety check by ensuring the wheel is securely attached and does not wobble or shift within the dropouts. Upgrading to a high-quality thru-axle skewer, like the Trifox Alloy Front Thru Axle Skewer for Boost Fork, is a straightforward yet effective way to enhance your bike's performance and safety. By choosing the right skewer for your bike and ensuring it's properly installed, you can enjoy increased stability, improved control, and a better overall riding experience. Whether you're a competitive racer or a weekend warrior, investing in the right components can make all the difference in your cycling adventures.
Choosing and installing the right handlebar parts for your bike is akin to selecting the perfect steering wheel for a car. It's not just about aesthetics; it's about comfort, control, and safety. The right handlebar setup can transform your riding experience, whether you're navigating urban streets, tackling rugged mountain trails, or racing on a sleek road bike. Understanding Handlebar Parts Before diving into the selection and installation process, it's crucial to understand the key components that make up your bike's handlebar system: 1. Handlebars: The main part that you hold onto while riding. They come in various shapes and sizes, tailored to different types of biking. 2. Stem: The component that connects the handlebars to the bike's fork steerer tube, affecting the bike's handling and rider's position. 3. Grips or Bar Tape: Materials wrapped around the handlebars to provide cushioning and grip for the rider's hands. 4. Bar Ends : Optional extensions at the ends of the handlebars, offering additional hand positions. Choosing the Right Handlebar Parts 1. Consider Your Riding Style The first step in choosing the right handlebar parts is to consider your primary riding style. Road cyclists may opt for aerodynamic bars that allow for multiple hand positions, while mountain bikers might prefer wider bars for better control over rough terrain. Touring cyclists, on the other hand, might value comfort over long distances and choose handlebars that facilitate an upright posture. 2. Select the Right Material Handlebars and stems are made from various materials, including aluminum, carbon fiber, and steel. Aluminum offers a good balance between strength, weight, and cost, making it a popular choice for many cyclists. Carbon fiber is lighter and can absorb road vibrations better but is more expensive. Steel is durable and has a classic look but is heavier. 3. Pay Attention to Size and Geometry The size and geometry of your handlebars significantly impact your bike's handling and your comfort. Handlebar width should roughly match your shoulder width for optimal control and comfort. The shape of the bars, such as the reach and drop (for road bikes), also affects your riding position and aerodynamics. Installing Handlebar Parts Tools You'll Need - Allen keys/hex wrenches - Tape measure - Handlebar tape or grips - Torque wrench (optional but recommended) Installation Process 1. Installing the Stem: If you're replacing the stem, loosen the bolts on the old stem and remove it from the steerer tube. Slide the new stem onto the steerer tube, ensuring it's at your desired height and angle. Tighten the bolts evenly but do not over-tighten. 2. Attaching the Handlebars: Place the handlebars in the stem clamp, adjusting them to your preferred angle and position. Most stems have four clamp bolts—tighten them in a cross pattern to ensure even pressure. Use a torque wrench if possible to avoid damaging the bars or stem. 3. Applying Grips or Bar Tape: For grips, simply slide them onto the ends of the handlebars and secure them according to the manufacturer's instructions. For bar tape, start wrapping at the end of the handlebars, keeping the tape tight and overlapping each wrap slightly. Finish by securing the tape with electrical tape or the provided adhesive strip. Final Tips - Always refer to the manufacturer's instructions for specific details and torque settings. - Regularly inspect your handlebar setup for signs of wear, damage, or loose components. - Consider professional fitting services if you're unsure about the best setup for your needs. By carefully selecting and correctly installing the right handlebar parts for your bike, you can enhance your riding experience, improve bike control, and enjoy greater comfort on your cycling adventures. Whether you're a seasoned cyclist or a beginner, the right handlebar setup can make all the difference in your ride.
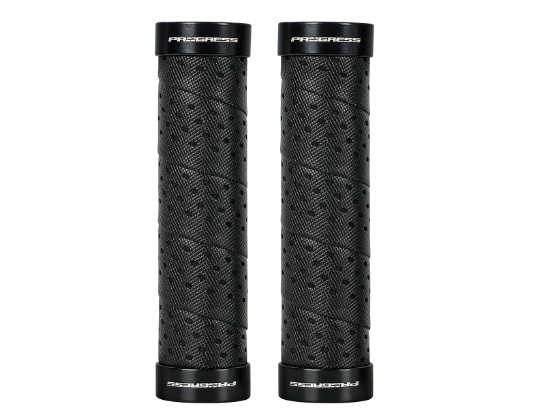
Cycling, for many, is not just a sport or a mode of transport—it's a passion, an escape, and a way to connect with the world. However, as any avid cyclist will tell you, the quality of your ride can significantly depend on the accessories you choose. Among these, slip cycling accessories, particularly handlebar grips, play a crucial role in enhancing your cycling experience. The Importance of High-Quality Handlebar Grips The connection between the rider and their bike largely occurs through two critical points: the pedals and the handlebars. While much attention is given to pedal efficiency and comfort, the importance of handlebar grips should not be underestimated. Quality grips prevent your hands from slipping, even in wet or sweaty conditions, providing better control and reducing fatigue. This is especially crucial for mountain bikers, who often navigate rough terrains and require superior grip to maintain control. Features to Look for in Slip Cycling Accessories When shopping for slip-resistant cycling accessories, there are several features to consider: Material: The grip material plays a significant role in comfort and slip resistance. Rubber grips, for example, offer excellent shock absorption and are naturally slip-resistant. Silicone grips are another popular choice, known for being lightweight and providing a soft touch. Ergonomics: Ergonomically designed grips can greatly reduce hand fatigue and discomfort during long rides. These grips are shaped to fit the contours of your hand, distributing pressure more evenly. Texture: The grip texture can also affect slip resistance. Some grips feature patterns or ridges to enhance grip, even when wet. Lock-On Feature: For mountain biking or rough terrain cycling, grips with a lock-on feature can be invaluable. These grips have a locking mechanism that prevents them from twisting or slipping off the handlebars. Upgrading Your Ride with the Right Accessories Choosing the right slip cycling accessories can make a significant difference in your overall riding experience. For instance, upgrading to high-quality handlebar grips can lead to improved bike control, reduced hand fatigue, and a safer ride. When selecting grips or other slip-resistant accessories, consider your specific needs—such as the type of cycling you enjoy and any personal preferences for material or design. Remember, the goal is to enhance your connection with your bike, making your rides more enjoyable and comfortable. Whether you're a road cyclist facing long distances or a mountain biker tackling challenging trails, the right accessories can elevate your performance and enjoyment. Conclusion Cycling is a dynamic and exhilarating activity that offers endless possibilities for adventure and exploration. By investing in high-quality slip cycling accessories, such as durable and ergonomic handlebar grips, cyclists can significantly enhance their riding experience. Not only do these accessories improve safety and control, but they also contribute to a more comfortable and enjoyable ride, regardless of the terrain. As you consider upgrading your cycling accessories, remember to prioritize functionality, comfort, and personal preference. With the right enhancements, your bike will feel like an extension of yourself, perfectly tuned to meet the challenges of the road or trail ahead.

Understanding Adaptive Cycling At its core, adaptive cycling is about modifying or customizing bicycles to meet the unique needs of riders who may not be able to use standard bikes due to disabilities or injuries. These modifications range from hand-powered cycles for individuals with lower-limb mobility issues to tandem bikes for those with visual impairments, and everything in between. The goal is simple yet profound: to make cycling accessible to all, enabling everyone to enjoy the sense of freedom that comes with pedaling down a path or road. Getting Started with Adaptive Cycling Choosing the Right Equipment: The first step on this journey is selecting the right bike. The market offers a wide array of adaptive bicycles, including tricycles, handcycles, and tandem bikes, each designed to cater to different abilities. It's essential to research and possibly consult with a specialist to find the equipment that best suits your needs and ensures a comfortable and safe riding experience. Seeking Training and Support: Learning to ride an adaptive bike, especially if it significantly differs from traditional bicycles, may require some guidance. Many organizations and cycling clubs offer training sessions for new adaptive cyclists, providing a safe environment to get accustomed to the new equipment. Additionally, connecting with the adaptive cycling community can offer invaluable support and advice. Planning Your Route: Not all roads or trails are created equal, especially when it comes to accessibility. Planning your route in advance can help avoid potential obstacles and ensure a smoother ride. Look for paths that are wide enough to accommodate your bike, have smooth surfaces, and feature minimal inclines, if necessary. Over time, as confidence and skill levels increase, more challenging routes can be explored. The Benefits of Adaptive Cycling Physical Health: Cycling is an excellent form of exercise, promoting cardiovascular health, strengthening muscles, and improving flexibility and coordination. For individuals with limited mobility, adaptive cycling opens up new opportunities for physical activity, which can be tailored to their fitness levels and abilities. Mental Well-being: Beyond the physical benefits, cycling offers a mental health boost. The sense of achievement from conquering a new trail or simply enjoying a leisurely ride in nature can significantly impact one's mood and self-esteem. Moreover, being outdoors and engaging in a group activity can combat feelings of isolation, fostering a sense of community and belonging. Independence and Freedom: Perhaps the most profound benefit of adaptive cycling is the sense of freedom it provides. For many, adaptive cycling offers a level of independence that might be difficult to achieve through other means. The ability to explore, travel, and engage with the world on one's terms is empowering, highlighting that disabilities do not define one's capabilities. Moving Forward The journey towards embracing the freedom of the road with adaptive cycling is as much about the community and shared experiences as it is about individual achievement. While challenges may arise, the adaptive cycling community continues to grow, driven by a collective mission to ensure that cycling is accessible and enjoyable for everyone. As we look to the future, the focus remains on innovation in adaptive cycling technology, expanding accessible cycling infrastructure, and fostering a more inclusive cycling culture. By advocating for these changes and supporting one another, we can continue to break down barriers and celebrate the joy of cycling in all its forms. In conclusion, adaptive cycling is not just about adapting bicycles to fit different needs; it's about adapting our mindset towards inclusivity and freedom. It's a testament to the human spirit's resilience, proving that with the right support and determination, the road truly is open to everyone. Let's pedal forward together, embracing every adventure that awaits on the horizon.
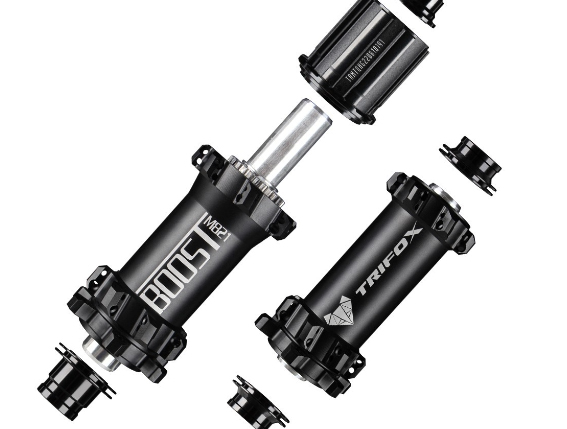
In the realm of mountain biking, the choice of each component on your bike plays a significant role in defining your ride's quality, performance, and durability. One such critical component that often goes underappreciated is the hub of a mountain bike. The hub sits at the core of your bike's wheels, influencing not only the wheel's performance but also affecting overall bike handling, acceleration, and efficiency. Understanding the Role of MTB Hubs At its essence, the hub is the central part of a bike's wheel, connecting the wheel to the bike's frame or fork via the axle. It allows the wheel to spin freely on two sets of bearings. For mountain bikes, hubs are designed to withstand the rough and tumble of off-road trails, providing a smooth ride over rocky paths, through mud, and across various terrains encountered on the trail. Thus, selecting a high-quality hub is paramount for any serious mountain biker. Performance: The Key Considerations When it comes to performance, several factors come into play. Firstly, the hub's engagement system is crucial. A hub with a higher number of engagement points can offer quicker response times when you start pedaling after coasting. This feature is particularly beneficial on technical trails where precise control over the bike is needed. Secondly, the weight of the hub influences the overall weight of the bike. While lighter hubs contribute to a more nimble and responsive ride, it's essential to balance weight with the strength and durability required for mountain biking. Lastly, the type of bearings used in the hub affects performance. Sealed cartridge bearings are commonly found in high-quality hubs due to their durability and resistance to elements like dust and water, ensuring a smoother ride and longer lifespan. Durability: Built to Last Mountain biking by its very nature subjects bikes to harsh conditions, making durability a non-negotiable aspect when selecting components. The material of the hub plays a significant role in its durability. High-quality materials such as aluminum and carbon fiber are favored for their combination of strength and lightweight properties. Furthermore, the construction of the hub, including how well it seals against dirt and moisture, directly impacts its longevity and maintenance requirements. Making the Right Choice Given the diverse offerings in the market, how does one choose the right MTB hub? Here are a few guidelines: - Engagement: Look for hubs with a high number of engagement points if you prioritize responsiveness and control.- Material and Construction: Opt for hubs made from durable materials like aluminum or carbon fiber, and pay attention to the quality of construction, especially the sealing systems.- Bearings: Prefer sealed cartridge bearings for their durability and ease of maintenance.- Compatibility: Ensure the hub is compatible with your bike's wheel size, brake type (disc or rim), and drivetrain specifications. Conclusion The hub may be a small component of a mountain bike, but its impact on the bike's performance and durability is substantial. By carefully considering factors such as engagement, weight, materials, and bearing types, you can select a hub that enhances your mountain biking experience. Whether you're upgrading an existing bike or building a new one from scratch, investing in a high-quality hub is a step towards achieving the perfect balance of performance and durability on the trails. Remember, the right hub not only improves your ride today but also ensures countless adventures for years to come.
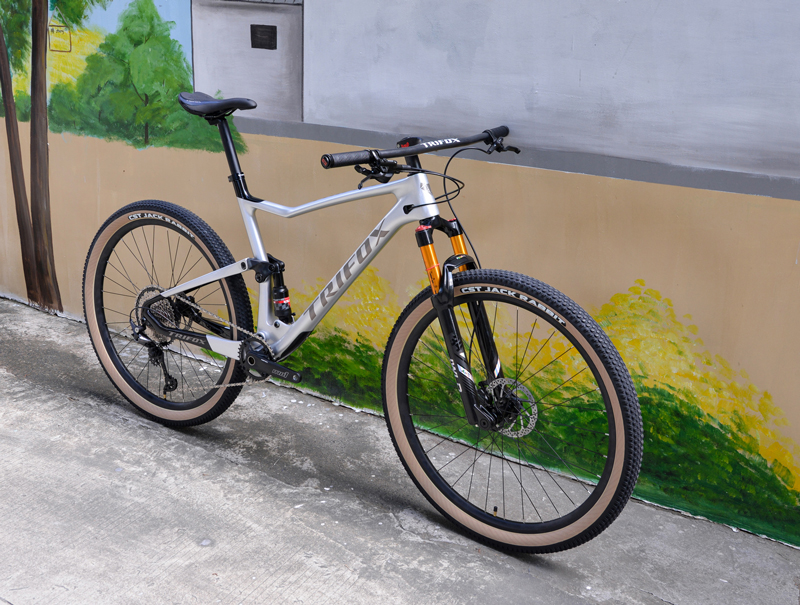
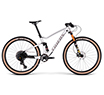
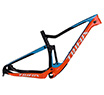
In the vast and evolving world of mountain biking, where the thrill of the ride meets the challenge of the terrain, having a bike that can conquer any trail is paramount. Enter the Pioneer bike, a marvel of modern engineering and design that promises to elevate your mountain biking experience to new heights. This full suspension bike, with its sleek carbon fiber frame and advanced components, is designed for riders who refuse to compromise on performance, no matter the terrain. The Heart of the Pioneer: Carbon Fiber Frame At the core of the Pioneer bike's exceptional performance is its carbon fiber frame. Known for its strength, durability, and lightweight properties, carbon fiber is the material of choice for high-performance bikes. The Pioneer takes this a step further by incorporating a dual suspension system with 110/115mm of travel, ensuring that shock absorption and responsiveness are maximized across all terrains. Whether you're navigating rocky paths, steep descents, or challenging climbs, the Pioneer bike remains unfazed, offering a smooth and controlled ride. Advanced Suspension for Unmatched Performance Suspension technology plays a crucial role in the performance of a mountain bike, and the Pioneer bike is equipped with a setup that's tailored for excellence. This advanced suspension system not only absorbs the shocks and bumps of uneven trails but also enhances the bike's handling and traction, allowing for a more confident and aggressive riding style. With such capabilities, riders can push their limits and explore new trails with ease. Geometry and Adjustability: Tailored to Your Riding Style One of the most notable features of the Pioneer bike is its ability to make small geometry adjustments. This level of customization ensures that riders can fine-tune their bike's setup to match their riding style and the specific demands of any trail. Whether you prefer a more aggressive stance for speed and performance or a more relaxed setup for comfort and endurance, the Pioneer bike adapts to your needs. Equipped for Excellence: SHIMANO Components and More No high-performance bike is complete without top-of-the-line components, and the Pioneer bike delivers in this regard. Equipped with SHIMANO MT200 components and a SHIMANO M6100 12-speed setup, it offers a wide range of gears to tackle any slope with ease. Additionally, the bike features wider CST 2.25'' wheels and carbon integrated bar/stem, enhancing its stability and steering precision. The guided internal cable routing not only contributes to a sleek aesthetic but also ensures a quieter ride on the trail. Beyond the Bike: TrifoxBike's Commitment to Quality and Service Choosing the Pioneer bike also means becoming part of the TrifoxBike family, a company renowned for its commitment to quality and customer satisfaction. With offerings that include complete bikes, frames, wheels, components, and accessories, TrifoxBike caters to all your cycling needs. Moreover, customers can enjoy benefits such as 24/7 live chat support, free shipping, and secure payment options, making the purchase and ownership experience as smooth and enjoyable as the ride on a Pioneer bike. Conclusion: The Ultimate Trail Companion The Pioneer bike stands out as a beacon of innovation and performance in the mountain biking world. Its combination of a carbon fiber frame, advanced suspension, customizable geometry, and high-quality components makes it a formidable tool for conquering any trail. Whether you're an experienced rider seeking to push your limits or a newcomer eager to explore the wonders of mountain biking, the Pioneer bike offers a ride that's both exhilarating and dependable. With the backing of TrifoxBike's exceptional service and support, embarking on your next adventure with the Pioneer bike promises not just a journey through the trails, but the discovery of new frontiers in performance and enjoyment.
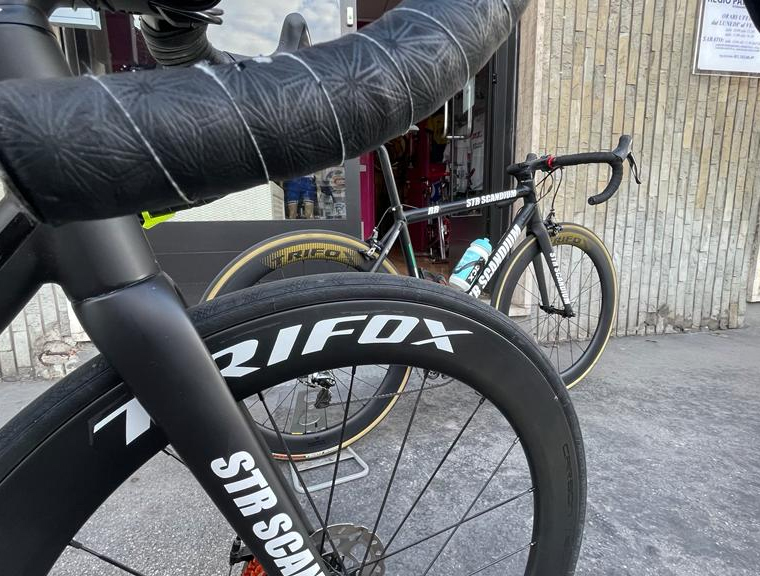
When it comes to optimizing your cycling experience, selecting the right bike wheels is paramount. Not only do they significantly influence your bike's overall performance and handling, but they also play a crucial role in ride comfort and speed. Among the multitude of options available in the market, carbon fiber wheels stand out for their exceptional balance of strength, lightweight, and aerodynamics, making them a preferred choice for both competitive cyclists and recreational riders alike. Why Choose Carbon Fiber Wheels? Carbon fiber wheels offer a unique set of benefits that distinguish them from their alloy counterparts. Firstly, their lightweight nature allows for quicker acceleration and easier climbing, which can be a game-changer on hilly terrains or when racing against the clock. Moreover, the stiffness of carbon fiber ensures efficient power transfer, allowing you to get the most out of every pedal stroke. Additionally, the material's ability to absorb road vibrations improves ride comfort, providing a smoother experience over rough surfaces. The Varieties of Carbon Road Bike Wheels Among the plethora of carbon wheel options, models like WT11, WT17, and WT18 have garnered attention for their superior design and performance characteristics. These wheels are crafted to meet the demands of diverse riding conditions, from flat, speedy stretches to winding mountain roads. - WT11: Ideal for riders seeking an all-around performance boost, these wheels offer a balanced profile that excels in various conditions, from racing to long-distance rides.- WT17: With a focus on aerodynamics, the WT17 model is perfect for cyclists aiming to reduce drag and improve speed on flat terrains and time trials.- WT18: Designed for climbers, the WT18 wheels feature a lightweight construction that makes ascents more manageable and responsive. Features to Consider When selecting the best carbon wheels for your ride, consider the following features to ensure they align with your cycling goals and preferences: - Rim Depth: A deeper rim cuts through the air more efficiently, offering aerodynamic advantages on flat roads. Conversely, shallower rims are lighter and more versatile, better suited for climbing and variable conditions.- Brake Compatibility: Ensure the wheels are compatible with your bike's braking system—whether traditional rim brakes or modern disc brakes.-Wheelset Weight: Lighter wheels accelerate faster and make climbing easier. However, weight should be balanced with other factors like durability and stiffness.- Durability and Maintenance: High-quality carbon wheels are built to last, but it's essential to consider the ease of maintenance and availability of replacement parts like spokes and hubs. Enhancing Your Ride with the Right Choice Upgrading to carbon fiber wheels can transform your cycling experience, offering improvements in speed, efficiency, and comfort. Whether you're a competitive racer looking to shave seconds off your time or a weekend warrior seeking a more enjoyable ride, there's a carbon wheelset tailored to your needs. Moreover, reputable suppliers often provide additional benefits such as free shipping for orders over a certain value, secure payment methods, and customer support services, making the purchasing process as smooth as possible. It's also worth noting that for customers in specific regions, customs duties might be included, removing potential hassles and additional costs. Conclusion In conclusion, investing in the right set of wheels is crucial for any cyclist looking to enhance their ride. Carbon fiber wheels, with their blend of lightweight, strength, and aerodynamic properties, offer a significant upgrade over traditional materials. By considering factors such as rim depth, brake compatibility, and wheelset weight, cyclists can find the perfect wheels to match their riding style and objectives. With the right wheels, your bike will not only perform better but also bring you more enjoyment and satisfaction on every ride.


