


Whether you're a seasoned cyclist or someone who's just taken a leap into the world of wheels, the importance of the bicycle hub cannot be overstated. It’s the core of your bike's wheel assembly, and everything from rolling resistance to handling can be influenced by its quality. This guide will take you through the meticulous process of choosing and installing an aluminum alloy hub, elevating your cycling experience to enjoy a smooth ride every time. The Heart of Your Bike: An Introduction to Hubs Before you even hit the road, the hub is whispering promises—of seamless motion, of endurance, and of the open road. But, what is a hub, exactly? The bicycle hub is a simple yet crucial component. It’s the center of the wheel, the part around which the wheel and tire rotate when in motion. The design and construction of the hub impact the functionality and performance of the entire wheel. And when it comes to material, nothing beats aluminum alloy for its blend of strength, lightness, and corrosion resistanc Why Choose Aluminum Alloy? Aluminum alloy hubs are preferred in many disciplines of cycling for their lightweight construction and efficient heat dissipation, which is particularly important for high-stress areas of the wheel where components may be more prone to heat damage. They are also less susceptible to rust and are often lighter, providing better acceleration and handling. Picking the Perfect Hub: Selecting the right hub is akin to choosing the heart for your bike's soul. It's not a decision to be taken lightly. Here's what you need to consider: Hub Type and Use Case Start with the basics—what type of cycling do you do? Road, mountain, or hybrid? Different types of cycling require different hubs. Road Bikes: Consider lightweight, low-friction sealed cartridge bearing hubs with a high-quality, fast-engaging freehub design. Mountain Bikes: Opt for rugged, durable, and easily serviceable cup-and-cone type hubs with strong, reliable axle systems. Hybrid Bikes: A middle ground of reliability and a blend of road and light off-road trail capabilities may warrant a mix of road and mountain bike hub features. Hub Width and Axle Standards The width of the hub will be dictated by your bike's frame and fork. Standard road bikes usually come with 130mm or 135mm rear spacing, while mountain and fat bikes will have wider spacing to accommodate broader tires and more robust wheels. Axle standards, such as quick-release (QR) or thru-axle, will also vary based on your bike's needs and age. Spoke Hole Count and Lacing Patterns The number of spoke holes in the hub flanges will directly influence the strength and design of your wheel. Ensure the hub you choose aligns with your wheelset's spoke count and lacing pattern for optimal performance. Freehub and Cassette Compatibility If you’re installing a rear hub on a geared bike, ensure that the freehub is compatible with the cassette. For example, modern road bikes typically use a standard Shimano or SRAM cassette spline. Mountain bikes could vary, with some requiring different interfaces for their cassettes. Sealed Bearings If regular maintenance isn't your forte, sealed bearings are a no-brainer. They protect against contamination and reduce the need for frequent overhauls, but they're typically non-adjustable compared to cup-and-cone systems. Your relationship with your bike is personal. Each ride is a story of adventure, progress, and joy. Your hub is the silent companion, ensuring you sail smoothly through all terrains. Aluminum alloy hubs, when chosen and set up correctly, can enhance every aspect of your cycling experience. From the initial selection to the final spin, your diligence will be well-rewarded. Now equipped with this comprehensive guide, may your wheels turn soundly, with the assurance of a well-fitted aluminum alloy hub at their core.

The integrated stem handlebar has become a popular choice among cyclists for its sleek design, aerodynamic benefits, and weight savings. However, selecting the best one for your cycling needs requires careful consideration. In this guide, we'll walk you through the process to help you make an informed choice. Understanding Integrated Stem Handlebars Integrated stem handlebars are a single unit that combines the handlebars and the stem. They offer a streamlined look, improved aerodynamics, and often a weight reduction compared to traditional separate stem and handlebar setups. However, they also limit adjustability, so it's crucial to choose the right one. Factors to Consider When Choosing an Integrated Stem Handlebar 1. **Width:** The width of your handlebars should match the width of your shoulders for optimal comfort and control. 2. **Reach:** This is the distance from the center of the handlebar top to the furthest edge of the brake hoods. A longer reach is suitable for cyclists with long arms or those who prefer a more aggressive riding position. 3. **Drop:** The drop is the vertical distance from the handlebar tops to the bottoms. A smaller drop is easier for riders to reach and is comfortable for long rides. 4. **Material:** Most integrated handlebars are made of carbon fiber for its strength, lightness, and vibration-damping properties. 5. **Cable Routing:** Many integrated handlebars allow for internal cable routing, which improves aerodynamics and gives a cleaner look. 6. **Compatibility:** Ensure the handlebar is compatible with your bike's frame, fork, and headset. Also, check compatibility with your groupset and accessories like lights or GPS mounts. Installing Your Integrated Stem Handlebar Once you've chosen the perfect integrated stem handlebar, it's time to install it. Here's a simple step-by-step guide: 1. **Remove Old Components:** Start by removing your old handlebars and stem. Be careful when disconnecting brake and gear cables. 2. **Install the Integrated Handlebar:** Place the new integrated handlebar in the correct position on the steerer tube and tighten it according to the manufacturer's specifications. 3. **Reconnect Cables:** Thread your brake and gear cables through the integrated handlebar, following the manufacturer's instructions for internal routing if applicable. 4. **Reinstall Components:** Reattach your brake levers, shifters, and any accessories. Make sure everything is secure and in the right position for you. 5. **Final Adjustments:** Finally, adjust your handlebar angle and brake lever position for optimal comfort and control. Conclusion Choosing the best integrated stem handlebar for your cycling needs can significantly enhance your riding experience. By understanding what to look for and how to install it, you can enjoy the benefits of a clean, aerodynamic setup. Happy riding!
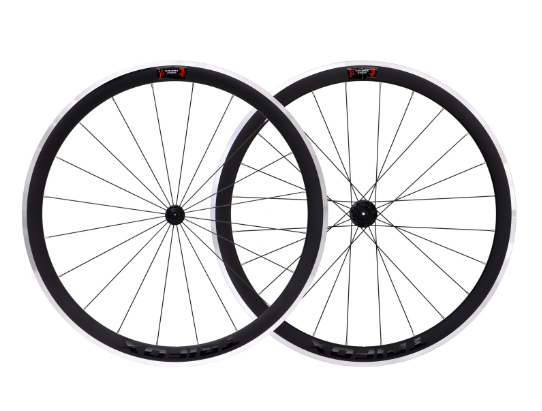
A new wheelset can dramatically improve the ride quality, speed, and control of your road bike. One crucial aspect of a wheelset is the rim brake, which is responsible for slowing down and stopping the bike. In this post, we'll guide you on how to choose and install a road wheelset rim brake for better control. Choosing Your Road Wheelset Rim Brake When selecting the right rim brake wheelset, consider these factors: 1. **Braking Surface:** Aluminum braking surfaces offer good braking performance in all conditions, while carbon surfaces can offer weight savings but may not perform as well in wet conditions. 2. **Rim Width:** Wider rims can accommodate wider tires, provide better stability, and improved aerodynamics. 3. **Rim Depth:** Deeper rims are more aerodynamic and rigid but might be heavier and more affected by crosswinds. 4. **Weight:** Lighter wheelsets can make a bike feel more responsive and easier to handle. 5. **Durability and Maintenance:** Consider the durability of the wheelset and how easy it will be to maintain and replace parts like spokes or bearings. Installing Your Road Wheelset Rim Brake Once you've chosen your ideal wheelset, it's time to install it. Here’s a step-by-step guide: Step 1: Remove Old Wheels Start by removing the old wheels from your bike. Release the brake calipers to allow the tires to pass through, then unscrew the quick release or thru-axle to remove the wheels. Step 2: Install New Tires and Tubes If your new wheelset didn't come with tires, you would need to install new ones. Put one side of the tire onto the rim, insert the tube, then work the other side of the tire onto the rim. Step 3: Install the Cassette The cassette is the set of gears on the rear wheel. To install it, simply slide it onto the freehub body of your new rear wheel and secure it with a lockring. Step 4: Install New Wheels Now it's time to put your new wheels onto your bike. Make sure the tires are facing the right direction, then slide the wheels into the dropouts and tighten the quick release or thru-axle. Step 5: Adjust Brake Calipers With the new wheels installed, you'll need to adjust the brake calipers to ensure they are centered over the rims and that the brake pads hit the rims squarely. Step 6: Check and Inflate Tires Finally, check that the tires are seated correctly on the rims and inflate them to the recommended pressure. Fine-Tuning for Better Control Once your new wheelset is installed, take the time to fine-tune your bike for better control. This could involve adjusting your saddle height, handlebar position, or even the tire pressure to suit your weight and riding style. Conclusion Choosing and installing a new road wheelset rim brake can significantly improve your cycling experience, offering better control, speed, and responsiveness. By understanding the key factors in choosing a wheelset and following the correct installation process, you can enhance your ride and enjoy the open road with newfound confidence. Happy cycling!
Building your own road bike can be an exciting and rewarding project. Not only does it give you the chance to customize your bike to fit your preferences, but it also allows you to gain a deep understanding of how your bike works. In this guide, we'll walk you through the process step by step. Step 1: Gather Your Materials The first step in building your own road bike is gathering all the necessary components. These include: - Frame - Fork - Headset - Stem - Handlebars - Seatpost - Saddle - Groupset (including gears, brakes, shifters, crankset, bottom bracket, chain, and cassette) - Wheels - Tires - Pedals Step 2: Install the Headset and Fork Begin by installing the headset into the frame. The headset is what allows the fork and the front wheel to turn smoothly. Once the headset is installed, slide the fork through the head tube of the frame and secure it according to the manufacturer's instructions. Step 3: Install the Stem and Handlebars Next, install the stem onto the top of the fork. The stem is what holds the handlebars in place. Once the stem is secure, attach the handlebars. Step 4: Install the Seatpost and Saddle Slide the seatpost into the frame and secure it at your preferred height. Then, attach the saddle to the seatpost. The groupset includes all the components that make your bike move and stop. Start by installing the bottom bracket and crankset, then add the front and rear derailleurs, the brakes, and finally, the shifters. Step 6: Install the Wheels and Tires Once the groupset is installed, it's time to add the wheels. Once they're secure, you can install the tires and inflate them to the recommended pressure. Step 7: Install the Pedals The final step is to screw the pedals into the crank arms. Step 8: Fine-Tune Your Bike Now that your bike is fully assembled, it's time to fine-tune everything. Adjust the saddle height and angle, the handlebar angle, and the brake and shifter positions to fit your preferences. Also, make sure to adjust the front and rear derailleurs for smooth shifting. Conclusion Building your own road bike can seem like a daunting task, but with the right tools, some patience, and this step-by-step guide, it's an achievable project. Plus, the satisfaction of riding a bike that you've built yourself is hard to beat. Happy building!
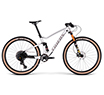
Dual suspension bicycles, also known as full-suspension bicycles, offer a comfortable ride over rough terrain. They absorb shocks from both the front and rear wheels, reducing the impact on the rider. However, to keep your ride smooth and your bicycle in top condition, regular maintenance and proper adjustment are key. This guide will walk you through the process. Understanding Your Dual Suspension System The dual suspension system in your bicycle consists of a front fork and a rear shock absorber. The front fork absorbs impacts from the front wheel, while the rear shock absorber does the same for the rear wheel. These components work together to provide a smoother ride over rough terrain. Routine Maintenance Regular maintenance of your dual suspension bicycle involves several steps: 1. Check for Loose Bolts: Ensure all bolts, especially those on the suspension system, are tight. 2. Check Tire Pressure:Proper tire pressure is crucial for optimal suspension performance. Consult your bike’s manual for the recommended pressure. 3. Inspect the Frame: Look for cracks or damage that could affect the bike's structural integrity. Adjusting Your Suspension Adjusting your suspension to match your weight and riding style can significantly improve your ride quality. Here's how: 1. Adjust the Sag:Sag refers to how much your suspension compresses under your weight. Most manufacturers recommend a sag of about 25-30% of the total travel. 2. Adjust the Rebound:The rebound controls how quickly the suspension returns to its original position after compressing. The right setting depends on personal preference and the terrain. Professional Servicing While routine maintenance can be done at home, some tasks require a professional. These include replacing worn-out parts and performing more complex adjustments. If you're unsure, it's best to consult a professional. Conclusion Maintaining and adjusting your dual suspension bicycle is crucial for optimal performance. Regular checks and adjustments will keep your ride smooth and prolong the lifespan of your bike. Happy cycling!
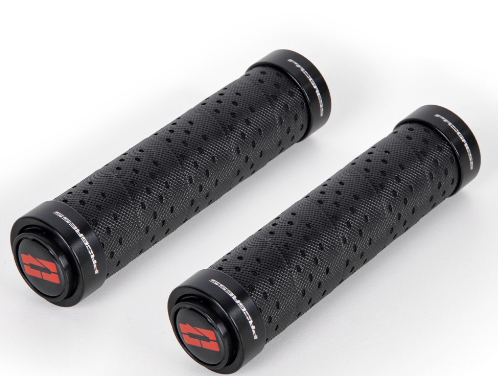
Mountain biking is a fantastic way to explore the outdoors, but it can be challenging at times. One important piece of equipment that often gets overlooked is the handlebar grip on your mountain bike. This small component can greatly affect your ability to control your bike, especially when tackling rough terrains. Over time, your grips can become worn out, causing discomfort and reducing your grip strength. While changing your grips may seem like a daunting task, it is actually quite simple. In this blog post, we will discuss how to easily changing grips on mountain bike. Before changing your grips, it is important to gather the necessary tools. You will need a new set of grips, grip glue, rubbing alcohol, a cloth, and a sharp knife or scissors. Once you have all of these items, you can begin the process of changing your grips. Firstly, remove the end caps on your handlebars by gently pulling them off. If they are difficult to remove, you can use a flathead screwdriver to pry them off slowly. After removing the end caps, use the sharp knife or scissors to cut off the old grips. Be careful not to cut into the handlebar itself. Next, apply rubbing alcohol to a cloth and clean the handlebars thoroughly. This will remove any dirt, oil, or residue left by the old grips. Once the handlebars are clean, apply grip glue to the inside of the new grips. Make sure to spread the glue evenly. Then, align the new grip on the handlebar, starting at the end and sliding it into place. Use your hands to push the grip onto the handlebar all the way to the end. Once the grip is in place, put the end cap back on by pressing it firmly onto the handlebar. Repeat the process for the other grip. Once both grips are in place, check to make sure they are properly aligned and tight. You should be able to move the grips a little without wiggling or twisting. Conclusion: Changing the grips on your mountain bike is a fast and easy way to enhance your comfort and control while riding. By following these simple steps, you can quickly and easily swap out your old grips for new ones. Remember to gather all of the necessary tools, clean your handlebars thoroughly, and apply grip glue evenly. With these tips in mind, you will be ready to hit the trails with your new grips in no time.
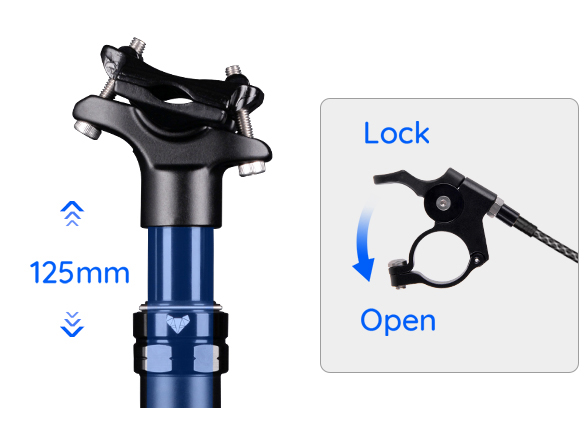
Cycling is not only a means of transportation, but it is also a great way to enjoy the outdoors, exercise, and stay healthy. However, if you want to get the most out of your cycling experience, you need to consider investing in a good lightest suspension seatpost. A suspension seatpost reduces the impact of the bumps and rough terrain on your body, which in turn reduces the risk of injury and makes your ride more comfortable. If you are looking for a light suspension seatpost that offers optimal performance, look no further than the Trifox suspension seatpost. 1. The Benefits of a Light Suspension Seatpost A light suspension seatpost has many benefits, including reduced weight, increased maneuverability, and improved comfort. When you reduce the weight of your bike, you can cycle further and faster, especially on uphill sections. A suspension seatpost also improves the handling of your bike, especially on rough terrain, making it easier to avoid obstacles and negotiate turns. Moreover, a suspension seatpost absorbs shocks and vibrations, which helps to reduce fatigue and discomfort, thereby allowing you to ride for longer periods. 2. The Features of the Trifox Suspension Seatpost The Trifox suspension seatpost is a top-of-the-line product that offers several advanced features. It is made from high-quality aluminum alloy, which makes it durable and lightweight. The seatpost has an air suspension system that allows you to adjust the level of damping to suit your riding style and terrain. The external cable routing and remote center are designed for convenience, ease of use, and compatibility with most bike frames. The Trifox seatpost has a travel range of 125mm, which falls into the sweet spot of travel for most mountain bikers. 3. The Importance of Weight One of the most crucial factors to consider when selecting a suspension seatpost is weight. A heavy seatpost can slow you down, make it difficult to climb hills, and reduce maneuverability. Therefore, it is essential to choose a light suspension seatpost that provides optimal performance while keeping weight to a minimum. The Trifox suspension seatpost weighs less than 500g, which makes it one of the lightest seatposts on the market today. 4. How to Choose the Right Size To ensure that you get the most out of your suspension seatpost, it is crucial to select the right size. The Trifox suspension seatpost comes in two sizes, 31.6mm and 30.9mm, which fit most bike frames. However, it is essential to ensure that the diameter of your bike frame matches the seatpost diameter for a perfect fit. You should also consider the length of the seatpost and the amount of travel you need for optimal performance. 5. Conclusion A light suspension seatpost is an essential component of any cyclist's arsenal, whether you're a professional, amateur, or recreational rider. The Trifox suspension seatpost offers optimal performance, durability, and comfort while keeping weight to a minimum. In addition, its advanced features, such as air suspension, external cable routing, and remote center, make it a versatile and user-friendly product. So, if you want to enjoy a comfortable and safe cycling experience, invest in a Trifox suspension seatpost today! Selecting a light suspension seatpost is crucial for enhancing your cycling performance and enjoying a comfortable ride. The Trifox suspension seatpost is a high-quality product that offers several advanced features, including air suspension, external cable routing, and remote center. It is made from high-quality aluminum alloy, which is durable and lightweight. The Trifox seatpost weighs less than 500g, making it one of the lightest suspension seatposts on the market today. So, whether you're a professional, amateur, or recreational rider, invest in a Trifox suspension seatpost to take your cycling experience to the next level.
Choosing the ideal road bike for your biking activities is far from easy. With a plethora of bike reviews and recommendations available on the internet, finding the perfect road companion has become increasingly challenging. However, paying close attention to specific characteristics such as frame material, weight, drivetrain, and wheel selection can help you decipher bike reviews and choose the best road bike that suits your needs. 1. Frame Material: The frame material is perhaps the most important factor to consider when selecting a road bike. Most bike manufacturers use lightweight material such as carbon fiber, aluminum, titanium, and steel to reduce the overall weight of the bike. Carbon fiber is the most popular material used in making high-end road bikes because of its lightweight, durable, and stiff qualities. Aluminum and titanium are also great options for mid-range bikes as they are strong, light, and affordable. Steel, on the other hand, is an excellent choice for people looking for a comfortable ride as it absorbs shocks better than the other materials. 2. Weight: The weight of the road bike is another essential factor to consider when reading bike reviews. A lightweight bike means better acceleration, handling, and easier uphill climbing, making it a perfect choice for racing and long rides. However, the flip side is that lightweight bikes are costlier than heavier ones. A heavier bike, on the other hand, is a suitable option for beginners and those who prefer more stability on the road. 3. Drivetrain: The drivetrain system of the bike is the component responsible for transferring the power from the pedals to the wheels. The number of gears a bike has, the type of shifters it features, and the range of gears it can achieve are all critical factors to look at when reading bike reviews. Most modern road bikes feature either a 2x or 3x drivetrain system with the 2x being the popular choice. However, each option has its advantages depending on your biking style and daily riding activities. 4. Wheel Selection: Wheel selection is another critical factor to consider when decoding bike reviews. Wheels play a crucial role in determining the handling, speed, and comfort of the bike. Most high-end road bikes feature lightweight and aerodynamic carbon fiber wheels that enhance rolling resistance and speed. However, alloy wheels are a great option for people looking for affordable yet functional wheels. 5. Bike Fit: Proper bike fit is essential to ensure that your riding experience is as comfortable and enjoyable as possible. When reading bike reviews, look for features such as saddle height, bike frame size, saddle angle, and handlebar position to determine whether the bike is an excellent fit for you. Additionally, make sure to test ride the bike personally to ensure that it feels comfortable and stable during riding. Choosing a road bike that meets your biking needs can be challenging, but paying close attention to essential factors such as frame material, weight, drivetrain, wheel selection, and bike fit can help you decipher bike reviews and select the perfect bike for you. Remember to also consider your budget and personal preferences when selecting your bike as they'll play a significant role in your biking experience. With this guide, we hope that you can choose the perfect road companion that'll help you enjoy riding for years to come. Happy biking!
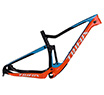
If you're looking to upgrade your off-road biking experience, investing in a light hardtail MTB (Mountain Bike) frame is the perfect place to start. A hardtail frame offers better power transfer and control compared to full suspension frames, which make them ideal for mountainous terrains, technical trails, and cross-country riding. However, with multiple models and brands on the market, it can be daunting to choose the ideal Lightest hardtail MTB frame for your needs. 1. Material The frame's material plays an essential role in determining its weight, stiffness, durability, and comfort. The most common materials used for hardtail MTB frames include Aluminum, Steel, and Carbon Fiber. Steel is the heaviest, but it offers superior durability, smooth riding experience, and affordability. Aluminum is a popular choice due to its lightweight, stiffer ride, and affordability. However, it can be uncomfortable on rough terrain compared to steel. Carbon Fiber is the lightest and stiffest material, which offers unparalleled comfort, shock absorption, and speed. It's the most expensive option but ideal for professional riders or enthusiasts who want the best. 2. Geometry and Fit The frame's geometry affects its handling, speed, and comfort. The ideal hardtail MTB frame should have a balanced geometry that offers stability, cornering, and speed. You should pay attention to the frame's Head Tube Angle, Top Tube length, Chainstay length, Bottom Bracket height, and seat angle. Also, ensure that the frame size fits your height and riding style. A frame that's too big or small can affect your balance, control, and safety on the trail. 3. Suspension The hardtail MTB frame offers front suspension, which is essential for shock absorption and comfort. However, you should choose a suspension fork that complements your riding style, the terrain you ride in, and your weight. The suspension fork should have adjustable damping, compression, and rebound to maximize your performance. It would be best to choose a lightweight fork to reduce the overall weight of the frame. Look for forks made from Carbon Fiber or Magnesium. 4. Wheels and Tires The wheels and tires are crucial components of a hardtail MTB frame, which affect your traction, speed, and comfort. The wheels should be robust and lightweight, with optimized spoke patterns to handle rough terrain and reduce weight. The tires should offer the right balance between traction, speed, and comfort. You should consider the type of terrain you ride in, weather conditions, and your riding style when choosing the tires. 5. Budget Finally, you should consider your budget when choosing the ideal Lightest hardtail MTB frame. The frame's price varies based on the material, brand, features, and performance. You can find reliable yet affordable hardtail frames made from Aluminum or Steel. However, if you're an enthusiast or professional rider, investing in a Carbon Fiber frame can offer superior performance and riding experience. Investing in a lightweight hardtail MTB frame can take your off-road biking to the next level. However, choosing the ideal frame requires careful consideration of various factors, including the material, geometry, suspension, wheels, tires, and budget. We hope this guide has equipped you with the knowledge to make an informed decision when choosing your next frame. Enjoy your next adventure!


